
Overview
Via Notebook / Desktop
- UZH Printplus (UPP)
Overview
All printers of the institute are connected to a central print server, which logs and counts all print jobs. Before a print is sent to a printer, the system gets the page number and job settings, calculates the costs and checks permissions and credits for the sender. After a successful printing, the credits will be subtracted.
| Credits and free printing | black and white | color |
| members of the institute* | free | free** |
| students*** | costs | costs |
* Members of the institute are: Professors, Staff, Assistants (!PostDocs and !PhDs), Guests.
** Assistants need to refill the credit (for free) after printing 100 colored pages per semester.
*** Students with 'Hauptfach Mathematik' or "Hauptfach Bio Statistic" get free credits worth 20 SFr. per semester. An I-MATH account is required to print.
A printjob is counted based on page number, page format (A4 or A3), simplex or duplex and black/white or color.
Special settings like A3, color or stapling are only available on some special printers like jcolor, k.
Prices for all printers with different settings!
Printing 'I-MATH' vs. 'UZH Printplus (UPP)'
At the institute there are two printing solutions available: 'I-MATH'-based and 'UZH Printplus (UPP)'-based.
| I-MATH | UPP | |
| Printer | All printers & copiers | Copiers 'kcolor' and 'jcolor'. Thinlinc Print Dialog: UZHPrintPlus |
| UZH wide | - | yes |
| Cost | Low. I-MATH pays the infrastructure | High. UZH |
| Scan | Only a few dedicated rooms (not public) | 'kcolor', 'jcolor' - use your UZH badge, free |
| Paying | see below | UZH Printplus |
Check your current print credit
- log in to http://www.math.uzh.ch/my
- Switch to the printing tab
- You will see the current amount of credit you have left and your own print history.
Charging Credit
You can view your credit, your settings and your last 50 print jobs in your account admin panel: My Math.
Users can charge credits at the office !Y27K30. The credit can be used immediately.
Assistants can also write an email to the system support, but in this case probably have to wait some time until the credit is loaded up.
Printer Names
- Printers are named after the room they are in.
- For the big printers on corridors of J and K floors several virtual printers with various configurations are provided .
Public printers
| Printer | Location | Color | Remarks |
|---|---|---|---|
| h52 | Y27 H52 | No | |
| j11 | Y27 J11 | No | |
| k49 | Y27 K49 | No | |
| k49color | Yes | ||
| j | J floor | No | Stapling, booklet print, A3 format |
| jcolor | Yes | Stapling, booklet print, A3 format | |
| jcolor_booklet | Yes | Only booklet print | |
| j-ps | Yes | Advanced options (!PostScript printer), A3 format | |
| k | K floor | No | Stapling, booklet print, A3 format |
| kcolor | Yes | Stapling, booklet print, A3 format | |
| kcolor_booklet | Yes | Only booklet print | |
| k-ps | Yes | Advanced options (!PostScript printer), A3 format |
Printing from your notebook
Please review the specific page:
You can also use our thinlinc client to connect to our enviroment where everything is set up already.
For additional information about how to connect to our servers from your computer or how to transfer data from your device to our thinlinc servers go to https://wiki.math.uzh.ch/public/thinlinc
Printing on Group-Accounts
People, who are assigned to a group (made by the IT), can print on this group account. All members of the group have a link on the myMath Homepage, where they can see the Print-History of the group.
For printing on a group account, a job-billing information has to be sent with the print job. In many print dialogs (for example: Firefox) you have in the tab 'Job' in the section 'Job Details' a field 'Billing info'. There you must enter the group name (all lowercase) to print on the group account. In other print dialogs (especially the gtklp dialog) you have in the tab 'Special' the field 'Extra Options'. There you must type: job-billing= where '' is again the lowercase group name you wish to print on. On a console (with lp command) you can use the option -o job-billing= for printing on a group account.
If you have problems with printing on a group account, please come to J11 or J40.
Create own printer instances
Create own printer instances with personal settings. Such instances are only available via command line.
[user@host
# Create an instance 'jcolor/bw', which prints to 'jcolor', but always in b/w:
$ lpoptions -p jcolor/bw -o ColorModel=Gray

# To use the new instance:
$ lp -d jcolor/bw output.pdf

# Show all printer, incl. instances:
$ lpstat -t

# The local instances are saved under
~/.cups/lpoptions
Printing with Command Line
| Description | Syntax / Example |
| List all printers | lpstat -a |
| Show default printer | lpstat -d |
| Set default printer | lpoptions -d Ex: lpoptions -d k |
lp [-d ] Ex: lp -d h52 paper.pdf |
|
| Print several copies (see notes) | lp -n [-d ] Ex: lp -n 5 paper.pdf |
| Print several copies (see notes) in the order 1,2,3... | lp -o Collate=True -n Ex: lp -o Collate=true -n 5 paper.pdf |
| Print several copies with staples (see notes) | lp -d -o RepeatJob= -o StaplePos=1PLUEx: lp -d j -o RepeatJob=10 -o StaplePos=1PLU exam.pdf |
| Print 2 pages on one site | lp -o number-up=2 Ex: lp -p number-up=2 paper.pdf |
| Printing one sided on a duplex printer | lp -o duplex=None Ex: lp -o duplex=None paper.pdf |
| Printing duplex with turning on short edge | lp -o duplex=DuplexTumble Ex: lp -o duplex=DuplexTumble paper.pdf |
| Printing transparencies | lp -o media=Transparency Ex: lp -o media=Transparency |
Printing with stapling (see note 1) - only j, jcolor, k, kcolor |
lp -d jcolor -o StapleType=StapleON -o StaplePos=(1PLU|1PRU|1PLB|1PRB|2PL|2PR|2PU|2PB) Ex: lp -d jcolor -o Duplex=None -o StapleType=StapleON -o StaplePos=1PLU -o sides=one-sided |
Printing booklet via jcolor_booklet and kcolor_booklet (see note 3) |
lp -d -o print-color-mode=Color|Grayscale Ex: lp -d jcolor_booklet -o print-color-mode=Color -o PageSize=A5 paper.pdf |
Printing booklet via j-ps and k-ps (see note 3) |
lp -d -o BindMode=SaddleStitch -o Duplex=None -o Booklet=Left -o print-color-mode=Color Ex: lp -d jcolor -o PageSize=A5 -o BindMode=SaddleStitch -o Duplex=None -o Booklet=Left -o Finishing=Col -o print-color-mode=Color paper.pdf |
Note 1: Pay attention on combining copies and stapling. If you like to print a PDF (e.g. 4 pages) 10 times, do NOT use the -n parameter. The whole printjob, 4 pages * 10 copies, will be stapled together (only one)!
Solution: Use the 'Repeat Job' option in the advanced tab of the print dialog
Note 2: Do not print many copies at once, because it requires a lot of resources of the printer.
Solution: Use the lpRepeat script instead (with the -s parameter to specify a delay):
$ lpRepeat -d h52 -n 30 -s 15 big_file.pdf
Note 3: Booklet printing can be simplified with the lpBooklet script:
# Color print
$ lpBooklet -d jcolor -f booklet.pdf

# Black & white print
$ lpBooklet -d j -f booklet.pdf
Option values
Duplex: one/two sided print
| Value | Meaning |
| None | One sided |
| !DuplexTumble | Two sided along long edge |
| !DuplexNoTumble | Two sided along short edge |
StaplePos: staple position
| Value | Portrait mode | Landscape mode |
| !PosNone | No staple | No staple |
| 1PLU | Upper left | Upper right |
| 1PRU | Upper right | Bottom right |
| 1PLB | Bottom left | Upper left |
| 1PRB | Bottom right | Bottom left |
| 2PL | Left x2 | Upper x2 |
| 2PR | Right x2 | Bottom x2 |
| 2PU | Upper x2 | Right x2 |
| 2PB | Bottom x2 | Left x2 |
| SDL | Middle x2 | Middle x2 |
Printing with graphical interface (evince PDF viewer)
Stapling
In the print preview dialog select j, jcolor, k, or kcolor and on the tab 'Advanced'
- choose the position of a staple (here upper left corner)
- specify Repeat Job if you need more than one copy
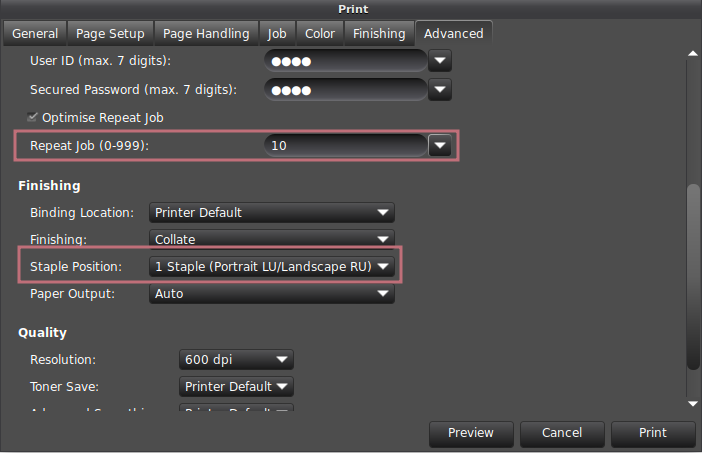
Note: do not specify Copies on the General tab to print several stapled copies! If you do so, all copies are stapled together!
Booklet
In the print preview dialog select jcolor_booklet or kcolor_booklet - these printers are already configured for booklet printing.
Alternatively, select j, jcolor, k, or kcolor and choose the following options:
- Left binding for Booklet Printing on the tab Finishing
- Saddle Stitch for Staple Position on the tab Advanced
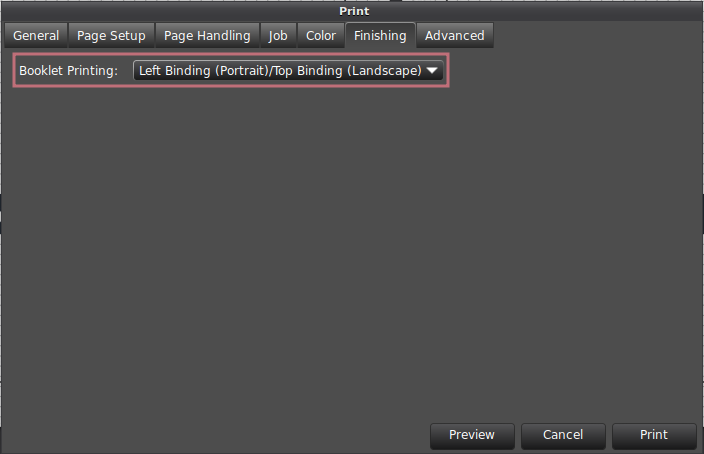
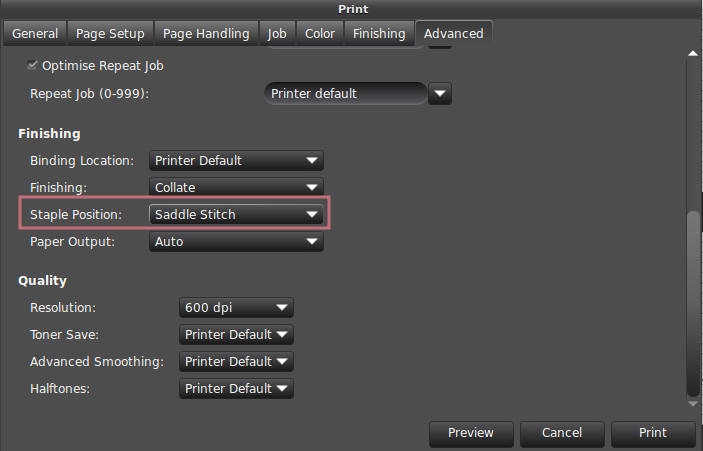
Note: booklet printing requires A4 or A5 format.
Printing exams - lpSequential
If you have a personalized exam, one PDF for all students, and you like to print it and the output should be:
- shifted (easy separation), or
- stapled,
than use the lpSequential script (commandline).
- For each exam print, the current page number is shown.
- You can stop a running print job, by pressing Ctrl-C in the commandline.
- If you stopped the printing, restart the printjob by specifing the last printed page + 1.
- : a printer name like
k,kcolor,j, orjcolor. - : If you have an exam pdf with 200 pages (one big file, 25 students, 8 pages per exam) the whole file will be split in jobs as and such part will be printed.
- : '1', if you start from scratch, else the last reported printed page + 1.
- : This is only necessary if you want to be sure that all exams are in exact same order as in the PDF. A reordering might appear inside the printer, if there are multiple print jobs at the same time in the local printer queue. If a delay is specified, this helps to take care that are never more than 2 jobs in the local printer queue at the same time. The amount of delay in seconds depends on the print job size. Start with 5 seconds and stop and increase if it is too short. You can check the local printer queue on the touchscreen at the copier.
# K Floor (k)
$ lpSequential -o Duplex=None -o StaplePos=1PLU -o StapleType=StapleON -o sides=one-sided <file.pdf> k <pages per exam> <start page to print from> <delay in seconds>
# J Floor (jcolor_booklet) - with color
$ lpSequential -o Duplex=None -o StaplePos=1PLU -o StapleType=StapleON -o sides=one-sided -o print-color-mode=Color <file.pdf> jcolor <pages per exam> <start page to print from> <delay in seconds>
Example:
| Staple | lpSequential -o Duplex=None -o StaplePos=1PLU -o StapleType=StapleON -o sides=one-sided exam.pdf k 16 1 0 |
printer 'k', 16 pages per exam, starting at 1, no delay |
| Shifting | lpSequential -o Duplex=None -o sides=one-sided exam.pdf jcolor 8 33 5 |
printer 'jcolor', 8 pages per exam, starting at 33, 5 seconds delay |
- Most exams are single sided, so switch of the default Duplex mode.
Poster Printing (large)
- ETHZ has outsourced most printing jobs, but you can still print large formats, see here: https://signprint.ch
and here for FAQ on ETHZ's decision to outsource etc: https://ethz.ch/staffnet/en/service/office-supplies-printing-and-mailing/print-publish/futureprint-eth.html