|
Size: 9720
Comment:
|
← Revision 138 as of 2024-07-01 06:23:17 ⇥
Size: 10737
Comment:
|
| Deletions are marked like this. | Additions are marked like this. |
| Line 13: | Line 13: |
| || [[https://drive.math.uzh.ch/index.php/s/B76tQxrwgGyQobj|Install Thinlinc]] (Video) || Installation of thinlinc client. || || Ctrl-Alt-Esc || Restart cinnamon window manager || |
|
| Line 124: | Line 126: |
| * Personal laptop: '''NO''' webcam support. Please start your VideoCall outside of the Thinlinc session. | * Personal laptop: '''NO''' webcam support. Please start your !VideoCall outside of the Thinlinc session. |
| Line 127: | Line 129: |
| * The Camera will not be available if you are already using it in another application. (Only one Application can access it at a time) * When the camera is on, there is a green Light on the left side of the lense. |
* The Camera will not be available if you are already using it in another application (only one Application can access it at a time) * When the camera is on, there is a green light on the left side of the lense. |
| Line 132: | Line 134: |
| * If your camera is not recognized by the application, enter `tlwebcam-ctl list-cameras` in the Terminal, to make sure the camera is connected in the first place. There needs to be at least one camera listed. | * If your camera is not recognized by the application, open a terminal and enter `tlwebcam-ctl list-cameras`, to make sure the camera is connected in the first place. There needs to be at least one camera listed. |
| Line 136: | Line 138: |
| * If the cameras' light isn't on and the Camera doesn't display anything in your VideoMeeting/Recording, enter `tlwebcam-reload` in the Terminal to reload the service completely. | * If the cameras' light isn't on and the camera doesn't display anything in your VideoMeeting/Recording, enter `tlwebcam-reload` in the Terminal, to reload the service completely. |
| Line 150: | Line 152: |
| * If broken: Disconnet (```F8 > Disconnect```) Thinlinc Session and log in again. Wait 5 seonds, 'Dummy...' should be replaced by 'Tunnel...'. * If still 'Dummy...' appears, `Logut' completely (System > Logout) and log in again. Now it should be fine. |
* If broken: Disconnet (```F8 > Disconnect```) Thinlinc Session and log in again. Wait 5 seonds, 'Dummy...' should be replaced by 'Tunnel...'. This fixes the majority of audio issues! * If still 'Dummy...' appears, `Logut' completely (System > Logout) and log in again. If this often required, contact [[http://math.uzh.ch/support|Support]]. |
| Line 158: | Line 160: |
| * If the System is using the wrong Audio Device or Microphone, unplug and plug again the desired device. | * If the System is using the wrong Audio Device or Microphone, unplug and plug again the '''desired''' device. |
| Line 185: | Line 187: |
| If `Set Default Printer` is disabled, open the printer via panel notification applet (lower right corner). If there is no printer applet: * Menu > System Settings > Applets > Manage > Printers > Settings > Show printer icon: When printers exist |
{{attachment:printer-default.png}} If `Set Default Printer` is disabled * Open the printer via panel notification applet (lower right corner) > <printer>. * After that, repeat the first step. * If there is no printer applet in the lower right corner: * Menu > System Settings > Applets > Manage > Printers > Settings > Show printer icon: When printers exist |
| Line 191: | Line 199: |
| = Multi-Head Support = * Fully supported via native client. * Mac OS X: "macOS (formerly OS X) versions newer than 10.9 installs with a default setting that breaks the multi monitor functionality of the ThinLinc client. A workaround to this problem is to disable setting ''Displays have separate Spaces'' in settings for Mission Control found in System Preferences." |
|
| Line 199: | Line 212: |
| * A: Known limitation in webbrowser, please use the native client. | * A1: Known limitation in webbrowser, please use the native client. * A2: Work around: open the menu on the left side > clipboard. Insert the clipboard, mark it, and copy it again to the clipboard - now it should be available via clipboard in any application. {{attachment:web-clipboard.png}} |
Thinlinc: Terminal Server Environment
Contents
- Thinlinc: Terminal Server Environment
- Cheat Sheet
- Connect Session
- Disconnect Session
- Get a new and fresh session
- USB sticks: Terminals in building Y27
- Remote Access: thinlinc@home
- Dropbox
- Keyboard Layout
- WebCam: MS-Teams / Zoom / Skype / SeminarLive
- Applets
- Filemanager: Nemo
- Setting Default Printer
- Multi-Head Support
- FAQ
Cheat Sheet
Action |
Note |
Disconnect Session |
Press 'F8' > 'Disconnect' |
Screen Lock |
Activate: Ctrl - Alt - L, |
~/thindrives |
|
~/thindrives |
|
Screen Size |
Press 'F8' > 'Fullscreen: Disable' to make a fullscreen Window resizable. |
The keyboard will be automatically detected during log in. If you need special characters, the easiest way is to use the 'Compose Key' |
|
Install Thinlinc (Video) |
Installation of thinlinc client. |
Ctrl-Alt-Esc |
Restart cinnamon window manager |
Accessing the same session locally (at the institute) and remotely (for example at home) - no hassle anymore with locked Firefox profiles.
IT Support: on your request, it is possible to 'shadow' your session to the IT group - in case of any trouble - just call the IT by phone.
Connect Session
- Use any of the Terminals at the institute or use the 'native client' (see below) application on your own computer (Internet access is needed).
- Just login.
- An already existing session (in the background or on another terminal) will be moved and reconnect you.
Server: tl.math.uzh.ch
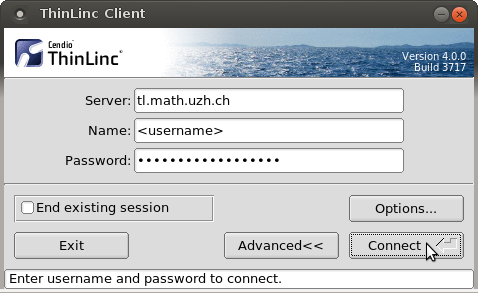
By default, the Session is fullscreen. To change this, open the 'popup menu' by pressing F8 and change Full screen.
Disconnect Session
Press F8 to open 'popup menu' and choose disconnect.
If you need the 'F8 key' in an application, assign another key for the popup menu. To do so: F8 > Options > Options > Popup Menu Key. The new setting is only active during the recent connected session.
Get a new and fresh session
Sometimes it happens that your session is locked for some reason (crashed apps, quota problem, ...). A session disconnect / reconnect does not improve the situation.
Please check the option End existing session in the tlclient login window and log in again. Your old session will be killed and a new session will be created. All open applications will be terminated. Open files might be lost. Use is with caution!
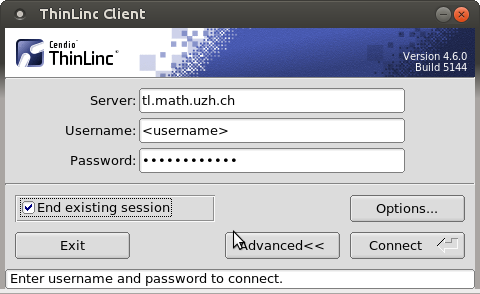
- This option is not available via Webaccess.
USB sticks: Terminals in building Y27
If you plug in a USB Stick at the terminal, there is no window, which opens automatically.
Plugged in USB sticks or ext. hard drives will appear in your home directory under the folder thindrives.
Open a Filemanager (Menu: Places) and navigate to your 'home directory > thindrives'.
- Mount and unmount happens automatically - wait a few seconds.
If you copy data, wait until the light on the USB stick stops flashing or the progress bar disappear, plus some additional seconds. After that, it's secure to remove the stick.
If the stick does not appear under directory '~/thindrives', please trigger a remount via menu Repair thindrives (USB Stick , ...).
Remote Access: thinlinc@home
By webbrowser
- No sound.
- No local drives
- For touch based devices (Tablets), you'll find a software keyboard on the top of the window,
By native client
Install the native Client (Linux, Windows, Mac): Download
- At the moment, there is no native Android, Windows Phone or iOS support. Use the webclient instead.
Start the native client and connect to:
tl.math.uzh.ch
- Be aware, the second character of the servername is a lowercase 'L'!
- Username / Password: as your I-MATH Account.
It is possible that you have to accept the hostkey: press 'Continue'
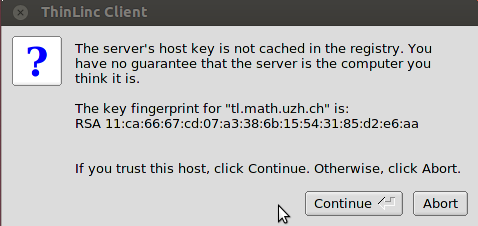
Disconnect / toggle Full screen: Pressing 'F8' opens a menu, with options for:
Disconnect.
changing Full Screen.
- Best practice: it's not necessary to log out, just disconnect.
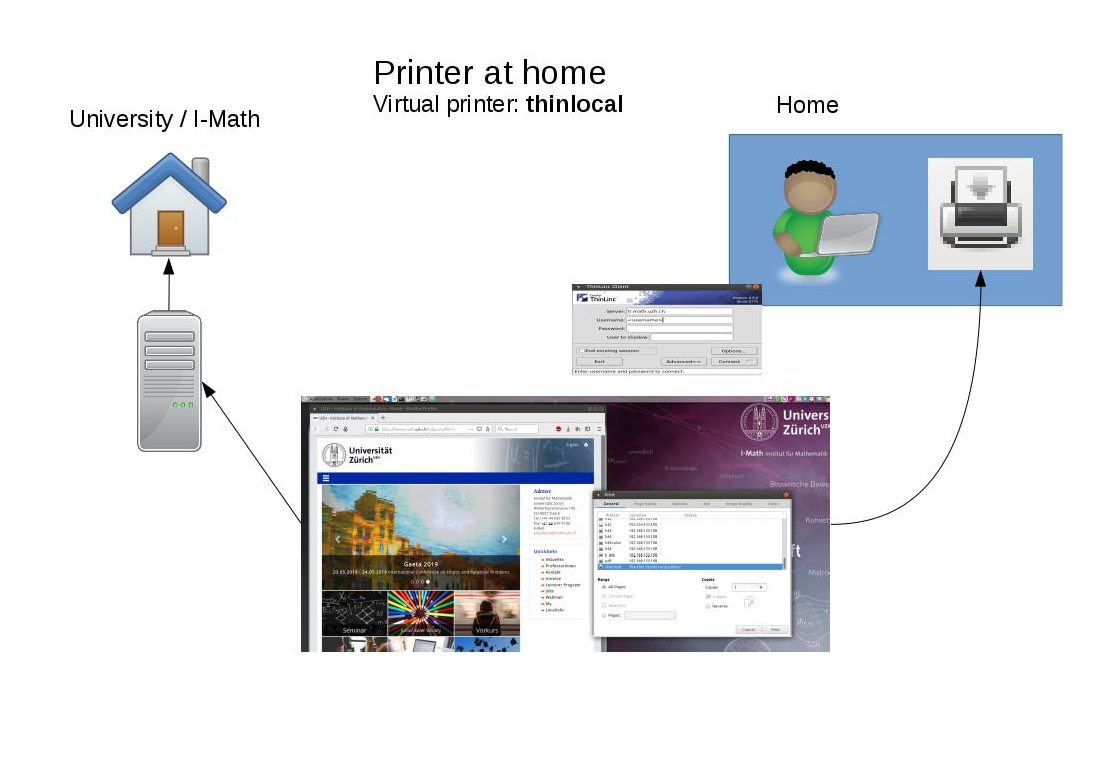
Printing at home
- Choose Thinlocal as Printer
- It automatically uses your default printer configured on your PC/Laptop at home
Copy files from/to the Thinlinc Session
- This is is very similar as with the USB sticks above.
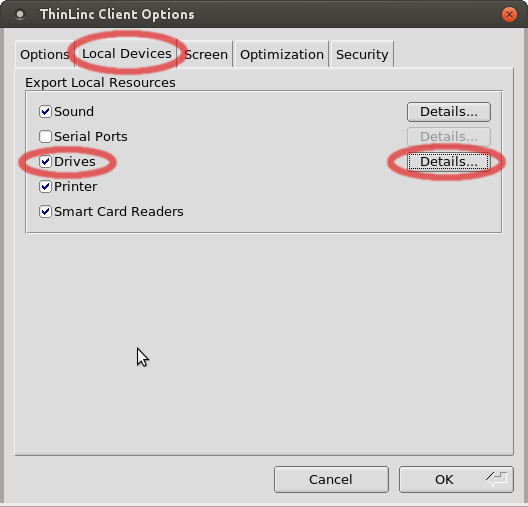
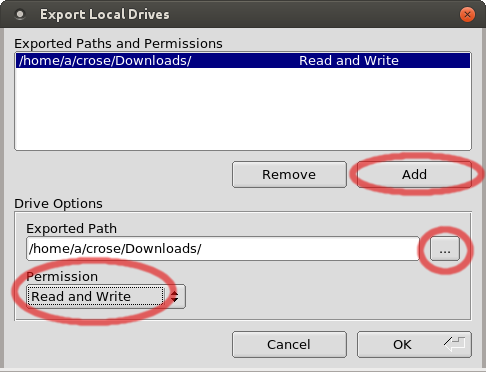
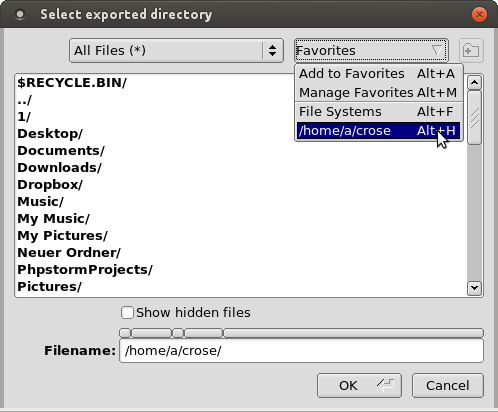
Add a mapping of local directories to the ~/thindrives directory inside the thinlinc session.
Do the mapping before you connect to the session:
Open the 'Thinlinc Client' and choose Options > Local Devices > Drives: Details
Add a new directory and set permissions.
If there are troubles with a mapped directory: inside the thinlinc session, choose the menu Repair thindrives (USB Stick , ...).
Connect to your thinlinc session.
Open the filemanager and navigate to thindrives inside your home directory.
If the directory does not appear under directory '~/thindrives', please trigger a remount via menu Repair thindrives (USB Stick , ...).
Dropbox
You can also use dropbox or switchdrive to copy data to the thinlinc session.
Keyboard Layout
A quick solution, to type characters not directly accessible on the keyboard, is by using the 'compose key' - please check ComposeKey.
Select keyboard layout:
- The Keyboard layout is stored on the terminal.
- If you move to a different terminal, you have to select the keyboard again.
- Before you connect to a thinlinc session (or if you are already logged into thinlinc: press F8 and uncheck 'Full screen'), select on the lower left corner:
Keyboard > Keyboard Layout: Edit ...
Website to convert keystrokes to specific languages: http://www.typeit.org/
WebCam: MS-Teams / Zoom / Skype / SeminarLive
Webcams are only supported on the terminals, installed at the institute!
Audio/Video Test: https://janus.conf.meetecho.com/echotest.html (press 'Start' on the top)
- Webcam Support:
Terminal in Y27: plug in the webcam.
Personal laptop: NO webcam support. Please start your VideoCall outside of the Thinlinc session.
You can borrow a webcam and/or a headset from Support.
- The Camera will not be available if you are already using it in another application (only one Application can access it at a time)
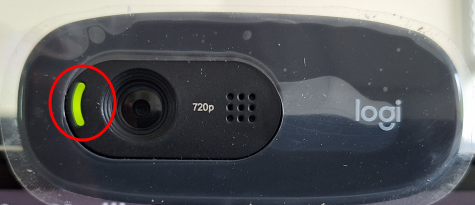
- When the camera is on, there is a green light on the left side of the lense.
If your camera is not recognized by the application, open a terminal and enter tlwebcam-ctl list-cameras, to make sure the camera is connected in the first place. There needs to be at least one camera listed.

If the cameras' light isn't on and the camera doesn't display anything in your VideoMeeting/Recording, enter tlwebcam-reload in the Terminal, to reload the service completely.
Audio
Audio redirection only works with the native client - not with the thinlinc browser version.
- Tablet: There is no sound redirecting, because there is no native client.
If there is no sound at all (verify by playing a youtube video), check the 'Audio redirection' via Pulse Audio Volume Control
ok: Output: Tunnel to 127.0.0.1:5...
broken: Output: Dummy output
If broken: Disconnet (F8 > Disconnect) Thinlinc Session and log in again. Wait 5 seonds, 'Dummy...' should be replaced by 'Tunnel...'. This fixes the majority of audio issues!
If still 'Dummy...' appears, `Logut' completely (System > Logout) and log in again. If this often required, contact Support.
- Audio / Mic is not working - do the following steps, exact in the given order:
F8 > Sesssion disconnect and than login again.
Unplug the USB Headset, wait 3 seconds and plug in again.
If the System is using the wrong Audio Device or Microphone, unplug and plug again the desired device.
Applets
Overview over all available applets: https://cinnamon-spices.linuxmint.com/
Installation:
Menu > Settings > Applets > Download (wait 10 seconds until the list is updated)
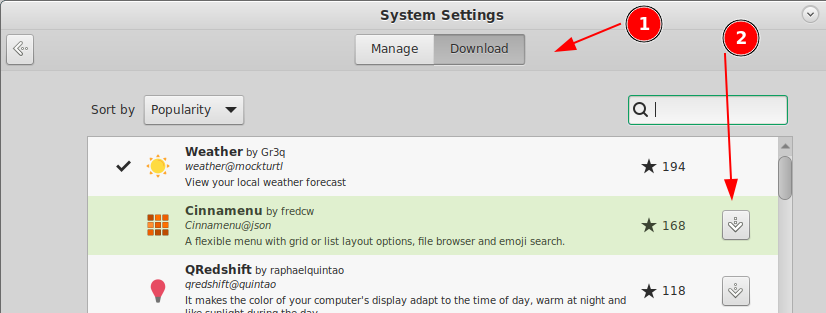
- Download the wished app.
- Switch to 'Manage' and activate (click on '+') the applet
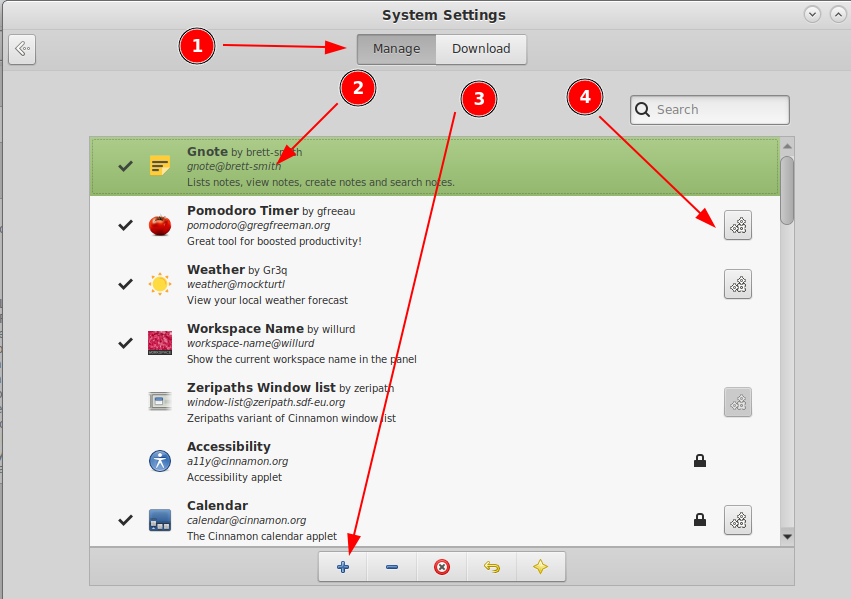
Filemanager: Nemo
15 nice tweaks: https://itsfoss.com/nemo-tweaks/
Setting Default Printer
Menu > Printers > right click (over printer) > Set Default Printer > Set as my personal default printer.
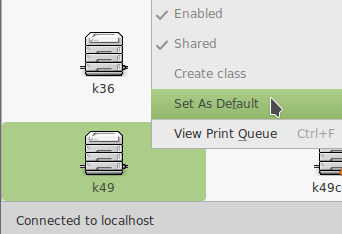
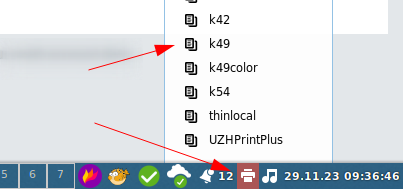
If Set Default Printer is disabled
Open the printer via panel notification applet (lower right corner) > <printer>.
- After that, repeat the first step.
- If there is no printer applet in the lower right corner:
Menu > System Settings > Applets > Manage > Printers > Settings > Show printer icon: When printers exist
Multi-Head Support
- Fully supported via native client.
Mac OS X: "macOS (formerly OS X) versions newer than 10.9 installs with a default setting that breaks the multi monitor functionality of the ThinLinc client. A workaround to this problem is to disable setting Displays have separate Spaces in settings for Mission Control found in System Preferences."
FAQ
- Q: The native client does not work
A: Please always use the latest version: https://www.cendio.com/thinlinc/download
- Q: Thinlinc via Webbrowser - clipboard is not working
- A1: Known limitation in webbrowser, please use the native client.
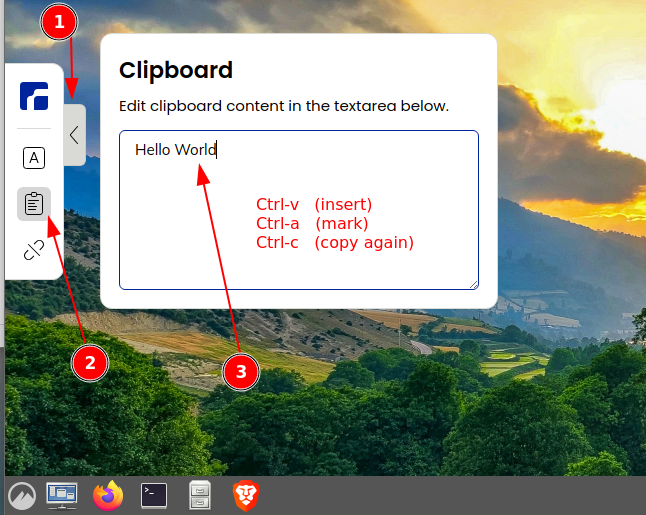
A2: Work around: open the menu on the left side > clipboard. Insert the clipboard, mark it, and copy it again to the clipboard - now it should be available via clipboard in any application.
