|
Size: 2377
Comment:
|
Size: 6794
Comment:
|
| Deletions are marked like this. | Additions are marked like this. |
| Line 5: | Line 5: |
| * The 'thinlic' environment will replace the 'Sun Ray' terminals during 2013. * Advantages of Thinlinc against 'Sun Ray': * Supports latest Linux OS natively. * This is the main reason for the migration. * Much better grafic speed: * Smoother scrolling on websites. * Playing Videos. * Much better USB Stick support. * Accessing the same session locally (at the institute) and remotely (for example at home). * IT Support will be possible by 'shadow'-ing the session with the IT group. * Disadvantage * 'power on' takes longer. * Sound problems after reconnecting the session. Start the application again (for webbrowsers: reload the webpage). * At the moment: 'Smart Card' support is not enabled. |
= Cheat Sheet = ||<rowbgcolor="#dddddd"> Action || Note || || Disconnect Session || Press ''' 'F8' '''> 'Disconnect ' || || Screen Lock || Activate: '''Ctrl - Alt - L''',<<BR>>Unlock: to display password prompt, press any key or move the mouse. Sometime it's necessary to press '''Esc''' two times. || || USB Stick / Local files|| '''~/thindrives''' || || Screen Size || Press 'F8' > 'Fullscreen: Disable' to make a fullscreen Window resizable.<<BR>>This is also usefull at the I-MATH Terminals, if the screen size fits not perfectly to the monitor (deactive and then activate the fullscreen mode again). || || [[#Keyboard_Layout|Keyboard Layout]] || The keyboard will be automatically detected during log in. If you need special characters, the easiest way is to use the 'Compose Key' || * Accessing the '''same''' session '''locally''' (at the institute) and '''remotely''' (for example at home) - no hassle anymore with locked Firefox profiles. * '''IT Support''': on your request, it's possible to 'shadow' your session to the IT group - in case of any trouble - '''just call the IT by phone'''. |
| Line 21: | Line 17: |
| == Connect & Disconnect Session == * Connect: just login. An already existing session (on anaother terminal) will be moved and reconnect to the new terminal. |
== Connect Session == * Use any of the Terminals at the institute or use the 'native client' (see below) application on your own computer (Internet access is needed). * Just login. * An already existing session (in the background or on another terminal) will be moved and reconnect you. * Server: '''tl.math.uzh.ch''' |
| Line 24: | Line 23: |
| * Check the screen size" by default the Session is '''fullscreen'''. To change this, open the 'popup menu' by pressing F8 and change '''Full screen'''. | |
| Line 25: | Line 25: |
| * Disconnect: Press F8 to open 'popup menu' and choose disconnect. * If you need the F8 key in an applications, assign another key for the popup menu. To do so: `F8 > Options > Options > Popup Menu Key`. The new setting is only active during the recent connected session. |
== Disconnect Session == * '''Press F8''' to open 'popup menu' and choose '''disconnect'''. * If you need the 'F8 key' in an application, assign another key for the popup menu. To do so: `F8 > Options > Options > Popup Menu Key`. The new setting is only active during the recent connected session. |
| Line 28: | Line 29: |
| == USB Sticks / external Harddrive, CDROM == * Plugged in USB sticks will appear in your homedirectory under `thindrives`. * Mount and unmount happens automatically. * If you copy data on it, wait until the light on the USB stick stops flashing, plus additional 10 seconds. After that, it's secure to remove the stick. |
== USB sticks: Terminals in building Y27 == * If you plug in a USB Stick at the terminla, there is '''no window''', which opens automatically. * Plugged in USB sticks, ext. Harddrives and CDROM will appear in your home-directory under the folder '''thindrives'''. Open a Filemanager (Menu: Places) and navigate to your 'home directory > thindrives'. * Mount and unmount happens automatically - wait a few seconds. * If you copy data, wait until the light on the USB stick '''stops''' flashing or the '''progress bar''' diasapepaer, plus additional 10 seconds. After that, it's secure to remove the stick. * If the stick does not appear under directory '~/thindrives', please trigger a remount via menu '''Applications > System Tools > Clean USB Stick umount/mount'''. == Copy files from/to the Thinlinc Session == * This is is very similar as with the USB sticks above. * Assumption: you're using a private computer - this computer is called the 'local computer'. * If you plug in a USB stick at the local computer, the directory of the USB stick is automatically '''mapped''' to the '''~/thindrives''' directory inside the thinlinc session. * You're free to map additonal directories, of the local computer, to your thinlinc session. 1. Open the 'Thinlinc Client' and choose '''Options > Local Devices > Drives: Details''' 2. Select {{attachment:thinlinc.options.local.drives.png}} {{attachment:thinlinc.select.png}} |
| Line 39: | Line 54: |
| == Remote: Terminals outside the institute - thinlinc@home == | == Remote: using the native client (Linux, Windows, Mac) from outside the institute - thinlinc@home == |
| Line 41: | Line 57: |
| * Install the native Client (Linux, Windows, Mac) - no Android or iOS Support. * Download: http://www.cendio.com/downloads/clients/ |
* Install the native Client (Linux, Windows, Mac): * Download: [[attachment:setup.thinlinc.imath.exe|Windows (I-MATH customized version)]] [[http://www.cendio.com/downloads/clients/|Linux & Mac]] * At the moment, there is no Android or iOS Support. |
| Line 50: | Line 67: |
* It's possible that you have to accept the hostkey: press 'Continue' {{attachment:hostkey.png}} * Pressing 'F8' opens a menu, with options for: * '''Disconnect'''. * changing '''Full Screen'''. * Never logout, just disconnect. |
|
| Line 52: | Line 77: |
=== Local printing === * Not configured at the moment. === Access local files - exporting local directories to the thinlinc session === * Before connecting to to thinlinc session, configure the directories to be connected between the local computer and the thinlinc session: * 'tlclient' > Options > Local Devices > * Drives: checked * Drives - Details > * Add * Exported Path: <the path of your local directory> * Permission: Read Only or Read Write (as you wish). * After any change, best is to close 'tlcient' and start it again. 'tlclient' always saves your last settings. * You'll find the local exported filesystem inside your thinlinc session under `~/thindrives`. = Keyboard Layout = * If you like to use a keyboard with a different layout than already installed in your office, please contact our IT support team. * '''Automatic layout detection''': While using the terminals at the institute, the keyboard layout should be detected automatically, regarding the connected keyboard type. * An efficient and fast solution, to type characters, which are not directly accessible on the keyboard, is by using the 'compose key' - please check [[ComposeKey]]. * '''Manual selected keyboard layout''': * This setting is only valid until session disconnects. * It's boring to change the keyboard layout every time you connect your session - unfortunately, there's no solution at the moment to make the 'manual selected keyboard layout' permanent. * '''Before log in''': on the left-bottom-corner of the '''login''' screen, you are free to choose another keyboard layout. * '''After log in''': If you want to change the keyboard layout on the fly (session is active): * Press 'F8' * Disable 'Fullscreen' * Then you'll see the icon of the 'keyboard layout switcher' in the lower left corner of the screen: click on it to open the 'keyboard layout switcher' * Select your favorite layout. * If you like, activate 'fullscreen' again by pressing 'F8' again and active 'Fullscreen'. * Website to convert keystokes to specific languages: http://www.typeit.org/ |
Thinlinc: Terminal Server Environment
Contents
- Thinlinc: Terminal Server Environment
- Cheat Sheet
- Usage
- Keyboard Layout
Cheat Sheet
Action |
Note |
Disconnect Session |
Press 'F8' > 'Disconnect ' |
Screen Lock |
Activate: Ctrl - Alt - L, |
USB Stick / Local files |
~/thindrives |
Screen Size |
Press 'F8' > 'Fullscreen: Disable' to make a fullscreen Window resizable. |
The keyboard will be automatically detected during log in. If you need special characters, the easiest way is to use the 'Compose Key' |
Accessing the same session locally (at the institute) and remotely (for example at home) - no hassle anymore with locked Firefox profiles.
IT Support: on your request, it's possible to 'shadow' your session to the IT group - in case of any trouble - just call the IT by phone.
Usage
Connect Session
- Use any of the Terminals at the institute or use the 'native client' (see below) application on your own computer (Internet access is needed).
- Just login.
- An already existing session (in the background or on another terminal) will be moved and reconnect you.
Server: tl.math.uzh.ch

Check the screen size" by default the Session is fullscreen. To change this, open the 'popup menu' by pressing F8 and change Full screen.
Disconnect Session
Press F8 to open 'popup menu' and choose disconnect.
If you need the 'F8 key' in an application, assign another key for the popup menu. To do so: F8 > Options > Options > Popup Menu Key. The new setting is only active during the recent connected session.
USB sticks: Terminals in building Y27
If you plug in a USB Stick at the terminla, there is no window, which opens automatically.
Plugged in USB sticks, ext. Harddrives and CDROM will appear in your home-directory under the folder thindrives. Open a Filemanager (Menu: Places) and navigate to your 'home directory > thindrives'.
- Mount and unmount happens automatically - wait a few seconds.
If you copy data, wait until the light on the USB stick stops flashing or the progress bar diasapepaer, plus additional 10 seconds. After that, it's secure to remove the stick.
If the stick does not appear under directory '~/thindrives', please trigger a remount via menu Applications > System Tools > Clean USB Stick umount/mount.
Copy files from/to the Thinlinc Session
- This is is very similar as with the USB sticks above.
- Assumption: you're using a private computer - this computer is called the 'local computer'.
If you plug in a USB stick at the local computer, the directory of the USB stick is automatically mapped to the ~/thindrives directory inside the thinlinc session.
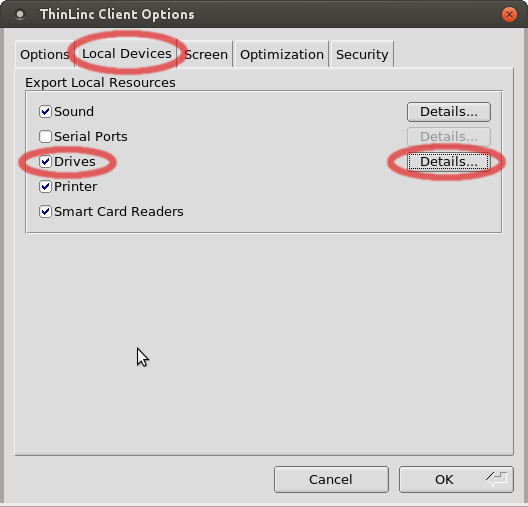
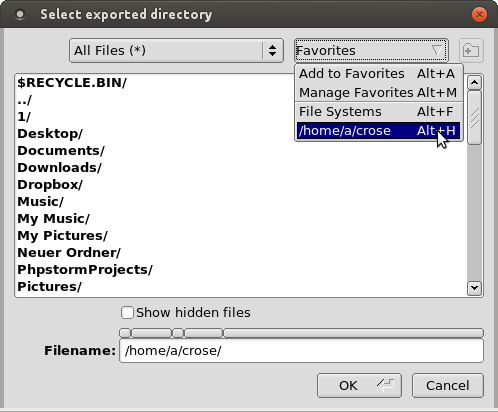
- You're free to map additonal directories, of the local computer, to your thinlinc session.
Open the 'Thinlinc Client' and choose Options > Local Devices > Drives: Details
- Select


Burning CDs & DVDs
- Not possible with the terminal.
Local: Terminals at the institute
- Login with your regular I-MATH account.
Remote: using the native client (Linux, Windows, Mac) from outside the institute - thinlinc@home
Native Client
- Install the native Client (Linux, Windows, Mac):
- At the moment, there is no Android or iOS Support.
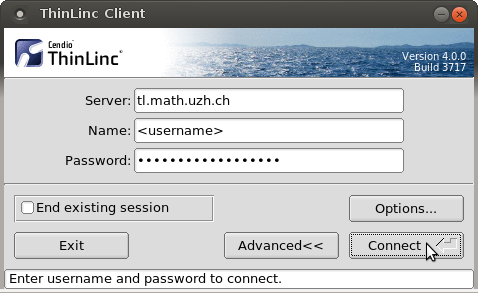
Start the native client tlclient (it's a standalone application, it's not a browser version)
Servername:
tl.math.uzh.ch
- Be aware, the second character of the servername is a lowercase 'L'!
- Username / Password: as your I-MATH Account.
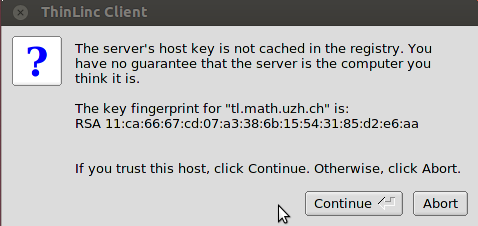
- It's possible that you have to accept the hostkey: press 'Continue'

- Pressing 'F8' opens a menu, with options for:
Disconnect.
changing Full Screen.
- Never logout, just disconnect.
Screen Size
After starting the tlclient choose under Options > Screen your desired screen size.
Local printing
- Not configured at the moment.
Access local files - exporting local directories to the thinlinc session
- Before connecting to to thinlinc session, configure the directories to be connected between the local computer and the thinlinc session:
'tlclient' > Options > Local Devices >
- Drives: checked
Drives - Details >
- Add
Exported Path: <the path of your local directory>
- Permission: Read Only or Read Write (as you wish).
- After any change, best is to close 'tlcient' and start it again. 'tlclient' always saves your last settings.
You'll find the local exported filesystem inside your thinlinc session under ~/thindrives.
Keyboard Layout
- If you like to use a keyboard with a different layout than already installed in your office, please contact our IT support team.
Automatic layout detection: While using the terminals at the institute, the keyboard layout should be detected automatically, regarding the connected keyboard type.
An efficient and fast solution, to type characters, which are not directly accessible on the keyboard, is by using the 'compose key' - please check ComposeKey.
Manual selected keyboard layout:
- This setting is only valid until session disconnects.
- It's boring to change the keyboard layout every time you connect your session - unfortunately, there's no solution at the moment to make the 'manual selected keyboard layout' permanent.
Before log in: on the left-bottom-corner of the login screen, you are free to choose another keyboard layout.
After log in: If you want to change the keyboard layout on the fly (session is active):
- Press 'F8'
- Disable 'Fullscreen'
- Then you'll see the icon of the 'keyboard layout switcher' in the lower left corner of the screen: click on it to open the 'keyboard layout switcher'
- Select your favorite layout.
- If you like, activate 'fullscreen' again by pressing 'F8' again and active 'Fullscreen'.
- This setting is only valid until session disconnects.
Website to convert keystokes to specific languages: http://www.typeit.org/
