|
Size: 1503
Comment:
|
Size: 3265
Comment:
|
| Deletions are marked like this. | Additions are marked like this. |
| Line 1: | Line 1: |
| = Screenshot under SunRay = | = Screenshot = |
| Line 3: | Line 3: |
| = General = * '''simple''': * press `Print Screen`: '''whole Desktop'''. |
We installed a new default Screenshot tool. When you press PrintScreen the Screen will get a dark overlay and you can select the Area you want to screenshot and immediatly start editing the image. Features: * Adjustable selection * Direct upload to the imgur to share the screenshot online * Usual features like copy to clipboard or save to disk * Highlight or blur parts of the screenshot * Place markings such as arrows, circles and rectangles on the image A quick usage preview can be seen here: {{attachment:animatedUsage.gif}} For additional information visit the git: https://github.com/lupoDharkael/flameshot For more advanced user, we also installed scrot, a command line tool that takes screenshot either fullscreen, current window or selection area. You can bind this command to the printscreen key if you visit System > Hardware > Keyboard Shortcut and scroll down to the custom keybinds. There you will see the Printscreen function and can edit it to execute one of those: {{{ # Create a screenshot of the entire screen in your home directory with a datetime stamp scrot ~/%y%m%d_%H%M.png # Create a screenshot of the current window in your homedirectory scrot -ub ~/%y%m%d_%H%M.png # Opens a selection tool to select the area to screenshot scrot -s ~/%y%m%d_%H%M.png }}} For advanced info on scrot type `man scrot` in a terminal. = Old info = * '''simple''': * --(press `Print Screen`: '''whole Desktop'''.)-- |
| Line 9: | Line 41: |
| * Save the file and load it to the desired application (image editor, or upload to a webpage, ...), '''or''' * copy it to the clipboard, switch to a image editor (f.e. Gimp) and paste the image there |
* Save the file and load it to the desired application (image editor, or upload to a webpage, ...), '''or''' * copy it to the clipboard, switch to a image editor (f.e. Gimp) and paste the image there |
| Line 28: | Line 60: |
| * Login to the wiki homepage * Select the desired page * |
* Login to the wiki homepage. * Select the desired page ('''view''', not edit!!!). * Click on `Attach File` (bottom of the page). * In `File to uplaod` select the file and press `Upload`. * Copy the command `[[attachment:screenshot.png]]` to the clipboard. * Edit the page: choose '''Text mode''' not 'GUI Mode'! * Insert the command `[[attachment:screenshot.png]]`. Replace `[[` with `{{` and `]]` with `}}` * Save the work. |
Screenshot
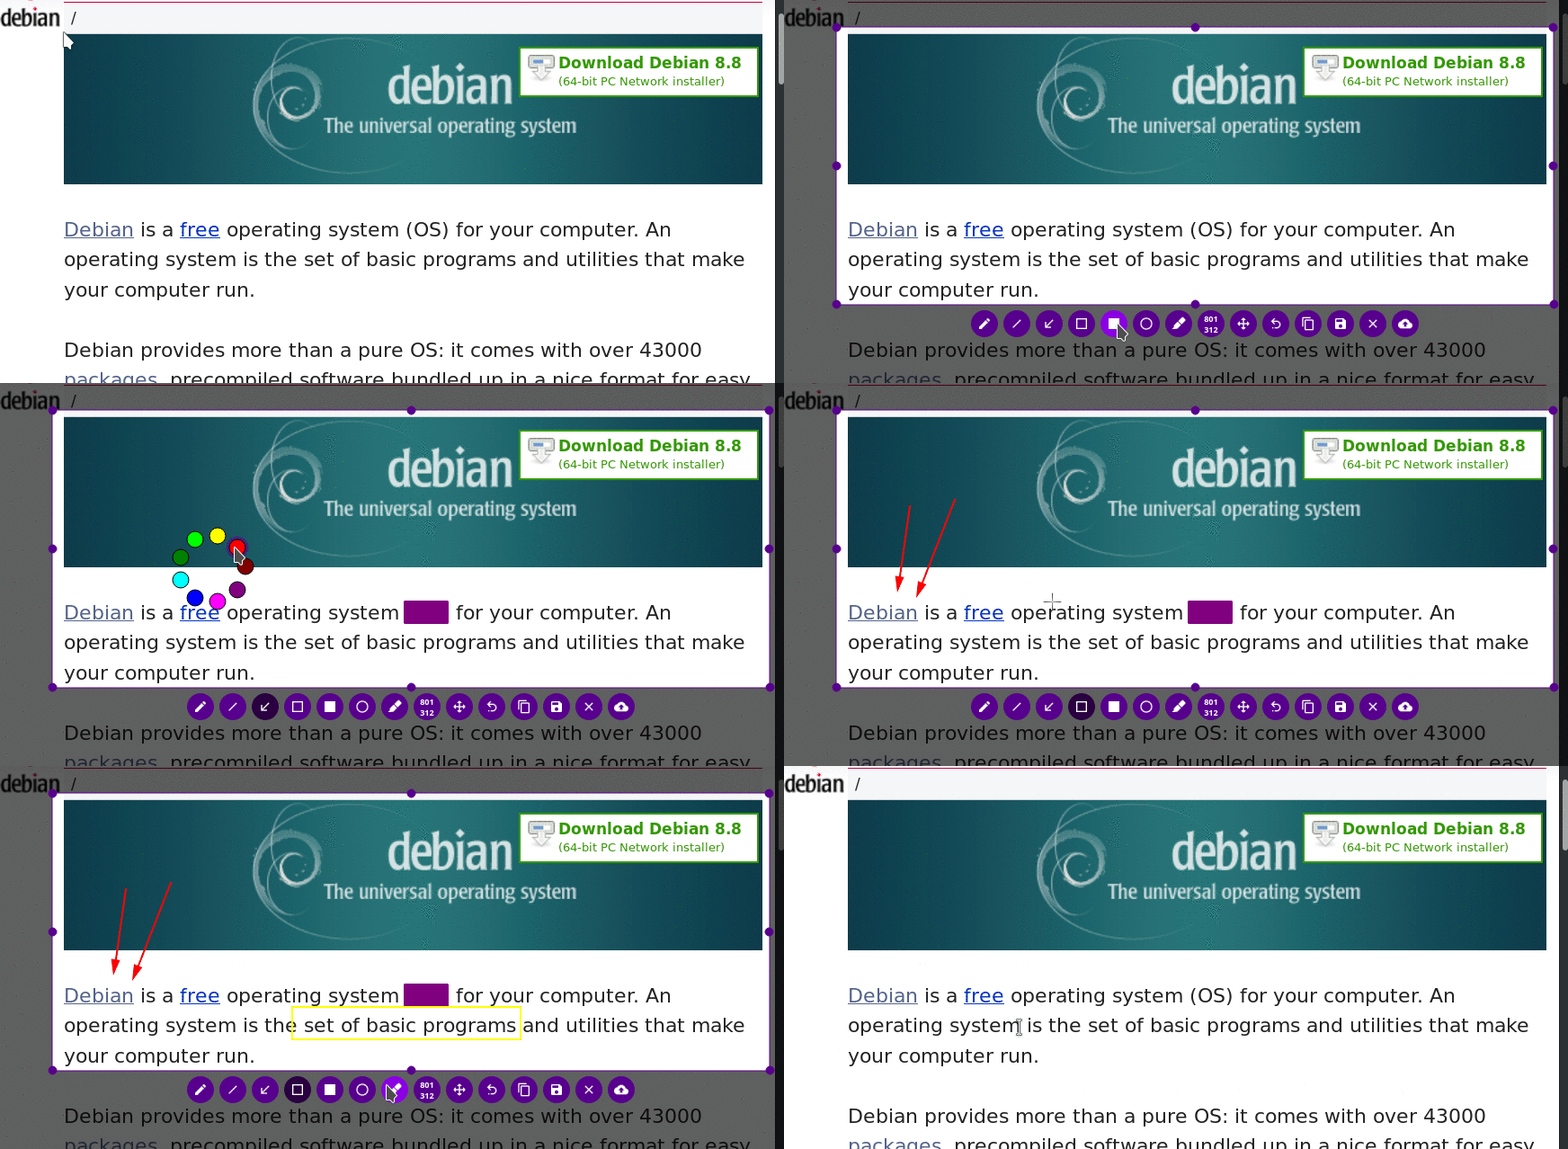
We installed a new default Screenshot tool. When you press PrintScreen the Screen will get a dark overlay and you can select the Area you want to screenshot and immediatly start editing the image.
Features:
- Adjustable selection
- Direct upload to the imgur to share the screenshot online
- Usual features like copy to clipboard or save to disk
- Highlight or blur parts of the screenshot
- Place markings such as arrows, circles and rectangles on the image
A quick usage preview can be seen here:

For additional information visit the git: https://github.com/lupoDharkael/flameshot
For more advanced user, we also installed scrot, a command line tool that takes screenshot either fullscreen, current window or selection area. You can bind this command to the printscreen key if you visit System > Hardware > Keyboard Shortcut and scroll down to the custom keybinds. There you will see the Printscreen function and can edit it to execute one of those:
# Create a screenshot of the entire screen in your home directory with a datetime stamp
scrot ~/%y%m%d_%H%M.png

# Create a screenshot of the current window in your homedirectory
scrot -ub ~/%y%m%d_%H%M.png

# Opens a selection tool to select the area to screenshot
scrot -s ~/%y%m%d_%H%M.png
For advanced info on scrot type man scrot in a terminal.
Old info
simple:
press Print Screen: whole Desktop.
You find the Print Screen (or in german Druck) key in the top row above Insert, Home, Page Up).
press Alt + Print Screen: active window.
- Next Step:
Save the file and load it to the desired application (image editor, or upload to a webpage, ...), or
- copy it to the clipboard, switch to a image editor (f.e. Gimp) and paste the image there
advanced:
Applications > Accessoires > Take Screenshot
- Options:
- Select 'delay' in seconds to snapshot
- Choose: a) full screen, b) only active window, c) specify region with the mouse.
- If you use 'Take Screenshot' regulary, put it in your top panel:
right mouse button over the panel > Add to panel > Double click 'Application Launcher' > click on '+' of Acessoires > scroll down and select 'Take Screenshot' > click 'Add' > click 'Close'.
- Further editing:
Gimp: Applications > Grafics > Gimp.
Short introduction: http://www.youtube.com/watch?v=8LmW5ndnEqw
Workflow to put images to the Wiki
- Activate the window to take screenshot of (left mouse click inside window).
Press Alt + Print Screen
- Save it.
- Default destination is your 'Desktop'. If you already have a file called 'Screenshot.png' there, a number will be appended to the filename.
- Wiki:
- Login to the wiki homepage.
Select the desired page (view, not edit!!!).
Click on Attach File (bottom of the page).
In File to uplaod select the file and press Upload.
Copy the command [[attachment:screenshot.png]] to the clipboard.
Edit the page: choose Text mode not 'GUI Mode'!
Insert the command [[attachment:screenshot.png]]. Replace [[ with {{ and ]] with }}
- Save the work.
