thinlinc1
- For login, check your MFA
Cheat Sheet
| Action | Note |
|---|---|
| Disconnect Session | Press 'F8' > 'Disconnect' |
| Screen Lock | Activate: Ctrl - Alt - L, Unlock: to display password prompt, press any key or move the mouse. Sometimes it's necessary to press Esc two times. |
| USB Stick | ~/thindrives |
| Local files | ~/thindrives |
| Screen Size | Press 'F8' > 'Fullscreen: Disable' to make a fullscreen Window resizable. This is also useful at the I-MATH Terminals, if the screen size does not fit perfectly to the monitor (deactivate and then activate the fullscreen mode again). |
| Keyboard Layout | The keyboard will be automatically detected during log in. If you need special characters, the easiest way is to use the 'Compose Key' |
| Install Thinlinc (Video) | Installation of thinlinc client. |
| Ctrl-Alt-Esc | Restart cinnamon window manager |
- Accessing the same session locally (at the institute) and remotely (for example at home) - no hassle anymore with locked Firefox profiles.
- IT Support: on your request, it is possible to 'shadow' your session to the IT group - in case of any trouble - just call the IT by phone.
Connect Session
- Use any of the Terminals at the institute or use the 'native client' (see below) application on your own computer (Internet access is needed).
- Just login.
- An already existing session (in the background or on another terminal) will be moved and reconnect you.
- Server: tl.math.uzh.ch
- By default, the Session is fullscreen. To change this, open the 'popup menu' by pressing F8 and change Full screen.
Disconnect Session
- Press F8 to open 'popup menu' and choose disconnect.
- If you need the 'F8 key' in an application, assign another key for the popup menu. To do so:
F8 > Options > Options > Popup Menu Key. The new setting is only active during the recent connected session.
- If you need the 'F8 key' in an application, assign another key for the popup menu. To do so:
Get a new and fresh session
Sometimes it happens that your session is locked for some reason (crashed apps, quota problem, ...). A session disconnect / reconnect does not improve the situation.
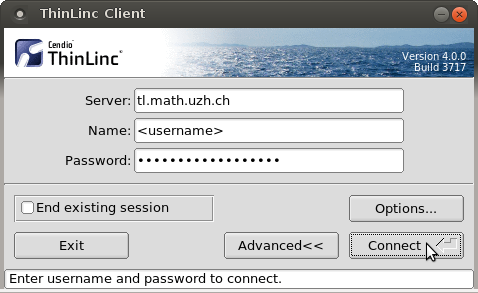
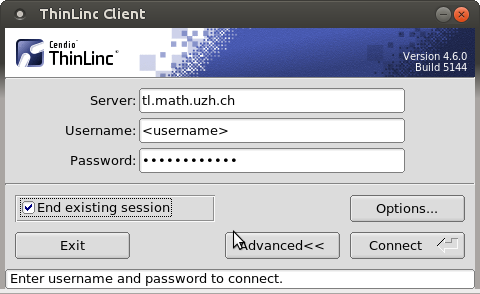
Please check the option End existing session in the tlclient login window and log in again. Your old session will be killed and a new session will be created. All open applications will be terminated. Open files might be lost. Use is with caution!
- This option is not available via Webaccess.
USB sticks: Terminals in building Y27
- If you plug in a USB Stick at the terminal, there is no window, which opens automatically.
- Plugged in USB sticks or ext. hard drives will appear in your home directory under the folder thindrives.
- Open a Filemanager (Menu: Places) and navigate to your 'home directory > thindrives'.
- Mount and unmount happens automatically - wait a few seconds.
- If you copy data, wait until the light on the USB stick stops flashing or the progress bar disappear, plus some additional seconds. After that, it's secure to remove the stick.
- If the stick does not appear under directory '~/thindrives', please trigger a remount via menu Repair thindrives (USB Stick , ...).
Remote Access: thinlinc@home
By webbrowser
- https://tl.math.uzh.ch
- No sound.
- No local drives
- For touch based devices (Tablets), you'll find a software keyboard on the top of the window,
By native client
- Install the native Client (Linux, Windows, Mac): Download
- At the moment, there is no native Android, Windows Phone or iOS support. Use the webclient instead.
* Start the native client and connect to:
tl.math.uzh.ch
- Be aware, the second character of the servername is a lowercase 'L'!
- Username / Password: as your I-MATH Account.
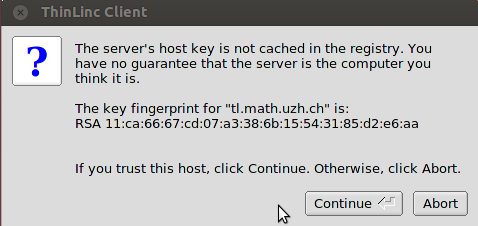
- It is possible that you have to accept the hostkey: press 'Continue'
- Disconnect / toggle Full screen: Pressing 'F8' opens a menu, with options for:
- Disconnect.
- changing Full Screen.
- Best practice: it's not necessary to log out, just disconnect.
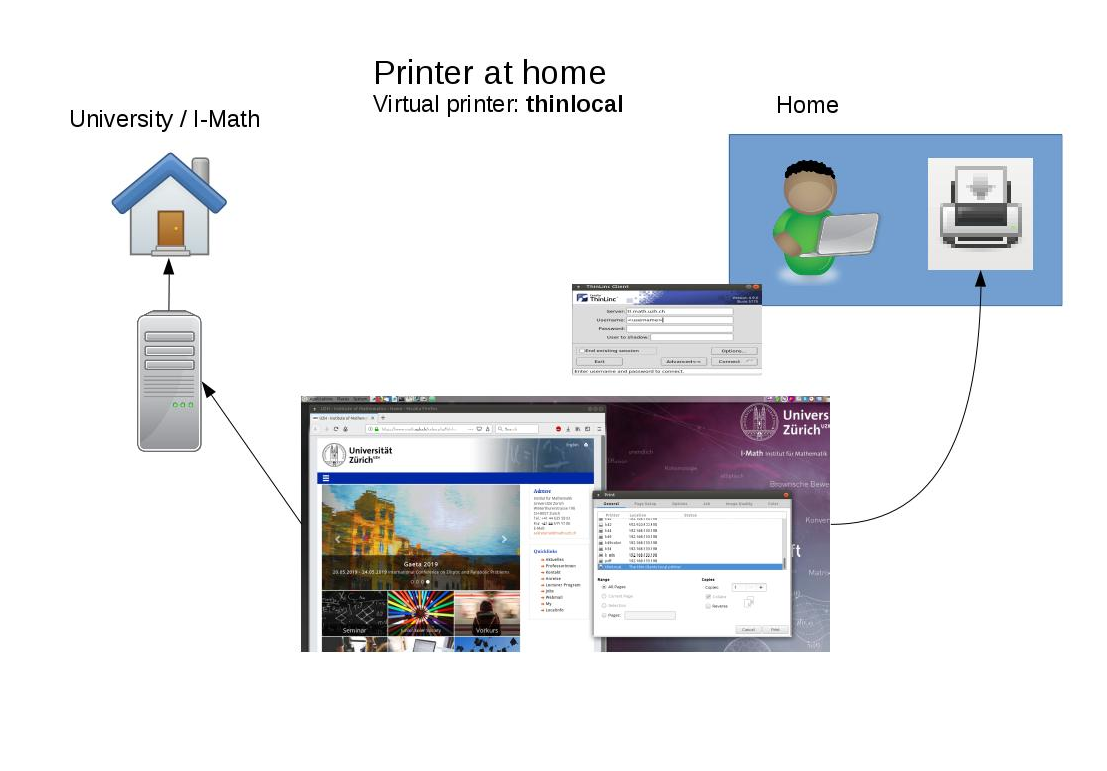
Printing at home
- Choose Thinlocal as Printer
- It automatically uses your default printer configured on your PC/Laptop at home
Copy files from/to the Thinlinc Session
- On your own computer:
- Open the 'Native Thinlinc Client' on your computer and choose Options > Local Devices > Drives: Details
- Create a mapping: add a new directory and set permissions.
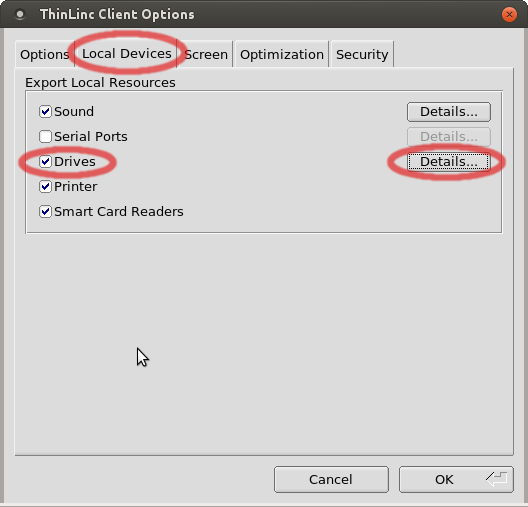
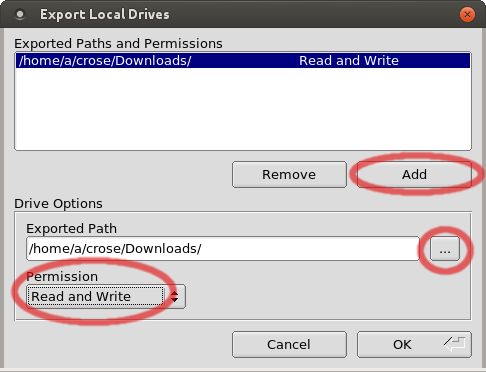
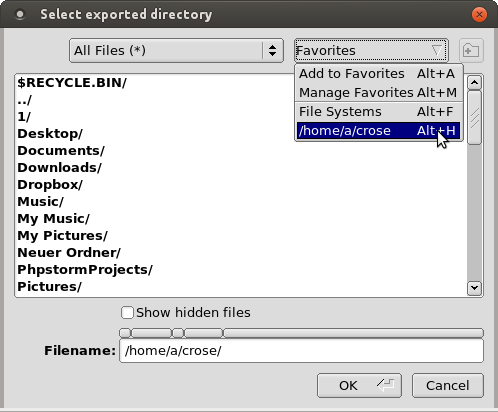
- Thinlinc Session
- Via the native client from above, Login to the thinlinc session.
- Open the file manager (lower left corner: Menu, type 'files') and navigate to thindrives inside your home directory.
- Hint: If there are troubles with a mapped directory (e.g. broken 'thindrives' directory in your thinlinc session), choose in the thinlinc session in the menu Repair thindrives (USB Stick , ...).
Dropbox
You can also use dropbox or switchdrive to copy data to the thinlinc session.
Keyboard Layout
- A quick solution, to type characters not directly accessible on the keyboard, is by using the 'compose key' - please check ComposeKey.
- Select keyboard layout:
- The Keyboard layout is stored on the terminal.
- If you move to a different terminal, you have to select the keyboard again.
- Before you connect to a thinlinc session (or if you are already logged into thinlinc: press F8 and uncheck 'Full screen'), select on the lower left corner:
Keyboard > Keyboard Layout: Edit ...
- Website to convert keystrokes to specific languages: http://www.typeit.org/
WebCam: MS-Teams / Zoom / Skype / SeminarLive
- Webcams are only supported on the terminals, installed at the institute!
- Audio/Video Test: https://janus.conf.meetecho.com/echotest.html (press 'Start' on the top)
- Webcam Support:
- Terminal in Y27: plug in the webcam.
- Personal laptop: NO webcam support. Please start your !VideoCall outside of the Thinlinc session.
- You can borrow a webcam and/or a headset from Support.
- The Camera will not be available if you are already using it in another application (only one Application can access it at a time)
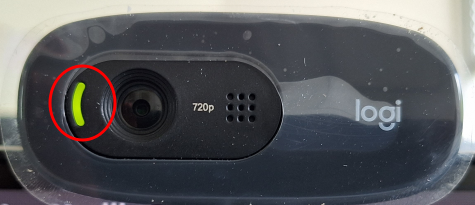
- When the camera is on, there is a green light on the left side of the lense.
Video
- https://webcammictest.com/
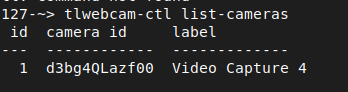
- (Check) If your camera is not recognized by the application, open a terminal and enter
tlwebcam-ctl list-cameras, to make sure the camera is connected in the first place. There needs to be at least one camera listed.
- (Fix 1) If broken: Disconnect (
F8 > Disconnect) Thinlinc Session and log in again. Reload the browser page. - (Fix 2) Power the terminal off and on . Connect again to the Thinlinc session. Reload the browser page.
- (Fix 3) If the cameras' light isn't on and the camera doesn't display anything in your VideoMeeting/Recording, enter
tlwebcam-reloadin the Terminal, to reload the service completely.
Audio
- Audio redirection only works with the
native client- not with the thinlinc browser version.- Tablet: There is no sound redirecting, because there is no native client.
Fix Problem
- https://webcammictest.com/mic/
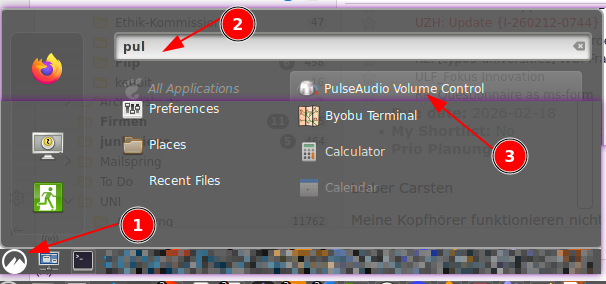
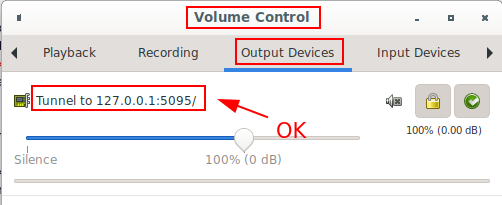
- Check: If there is no sound at all (verify by playing a youtube video), check the 'Audio redirection' via
Pulse Audio Volume Control- ok: Output: Tunnel to 127.0.0.1:5...
- broken: Output: Dummy output
- Fix 1: If broken: Disconnect (
F8 > Disconnect) Thinlinc Session and log in again. Wait 5 seonds, 'Dummy...' should be replaced by 'Tunnel...'. This fixes the majority of audio issues! - Fix 2: Audio / Mic is not working - do the following steps, exact in the given order:
F8 > Session disconnectand than login again.- Unplug the USB Headset, wait 3 seconds and plug in again.
- If the System is using the wrong Audio Device or Microphone, unplug and plug again the desired device.
- Fix 3: If still 'Dummy...' appears (see 'Check'), `Logout' completely (Menu > Logout) and log in again. If this is often necessary (more than once a month), contact Support.
Cinnamon
Applet
- Overview over all available applets: https://cinnamon-spices.linuxmint.com/applets
Installation:
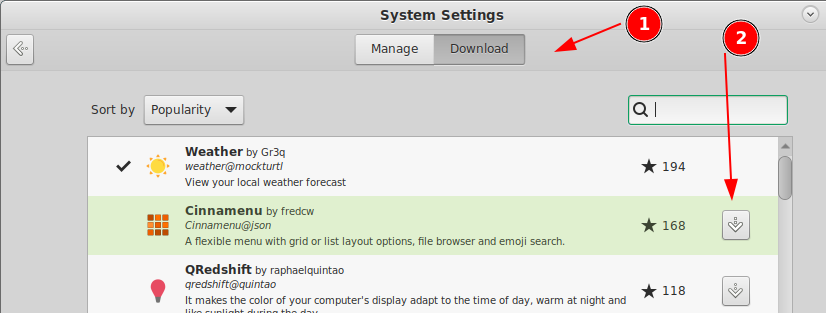
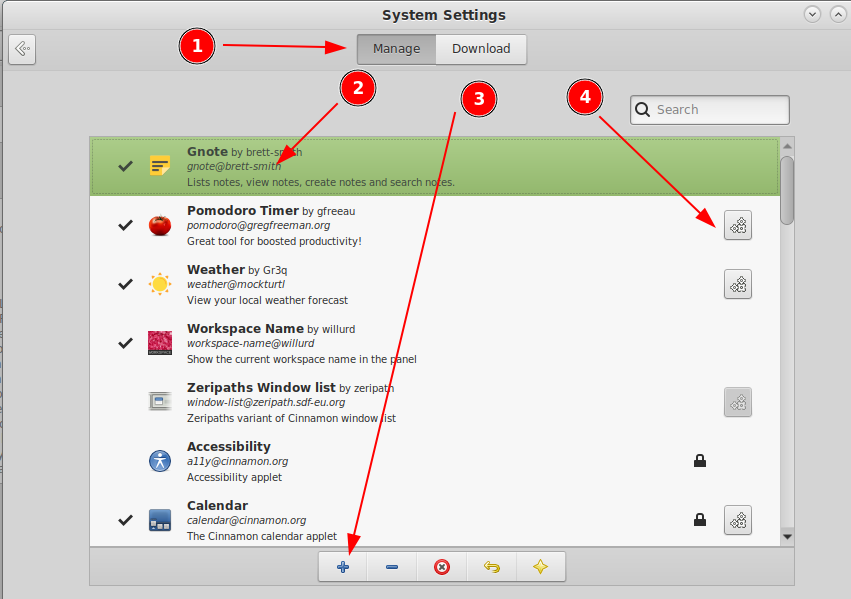
- Download the wished app.
- Switch to 'Manage' and activate (click on '+') the applet
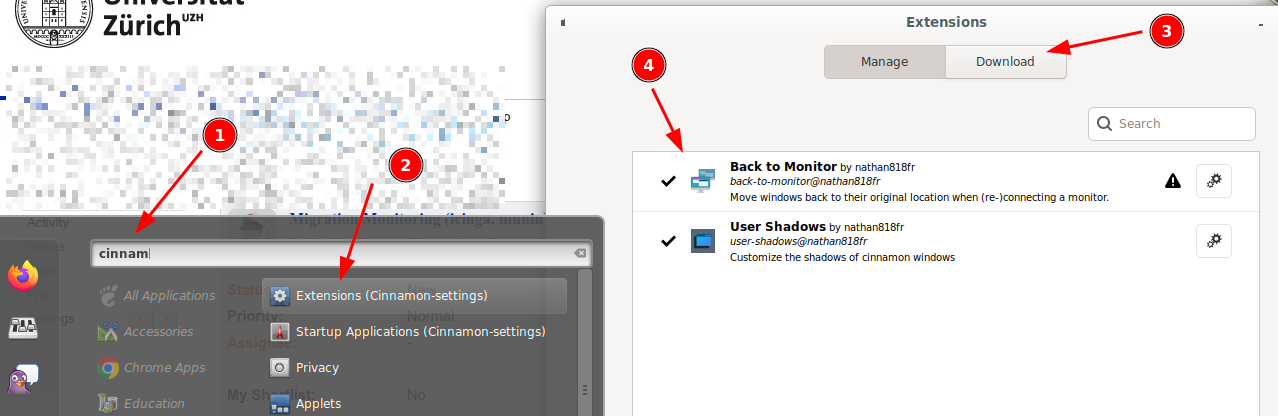
Extension
Filemanager: Nemo
- 15 nice tweaks: https://itsfoss.com/nemo-tweaks/
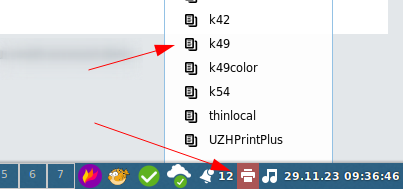
Setting Default Printer
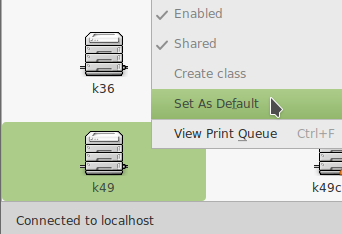
If Set Default Printer is disabled
- Open the printer via panel notification applet (lower right corner) > .
- After that, repeat the first step.
- If there is no printer applet in the lower right corner:
- Menu > System Settings > Applets > Manage > Printers > Settings > Show printer icon: When printers exist
Multi-Head Support
- Fully supported via native client.
- Mac OS X: "macOS (formerly OS X) versions newer than 10.9 installs with a default setting that breaks the multi monitor functionality of the ThinLinc client. A workaround to this problem is to disable setting Displays have separate Spaces in settings for Mission Control found in System Preferences."
Primary / Secondary Display
- In a multi head setup, one screen becomes the primary screen.
- Typically, on the primary screen is the menu bar.
- Most people prefore the left screen as primary. This can be configured.
- Sometimes a computer (lthinstations in the institute) detects the connected screens in a different order, and than suddenly the primay screen is on the wrong side.
How to fix / change primary sceen:
- Disconnect from thinlinc session.
- Open the screen setup on your computer.
- On thinstation (computer at the institute): Menu > Configuration > Display Properties
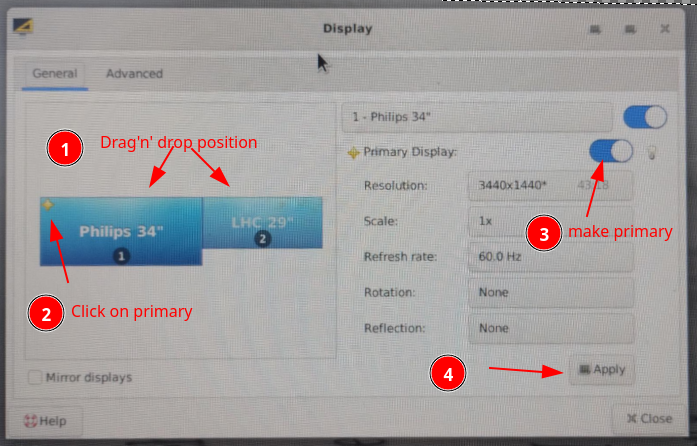
- Login to thinlinc
FAQ
- Q: The native client does not work
- A: Please always use the latest version: https://www.cendio.com/thinlinc/download
- Q: Thinlinc via Webbrowser - clipboard is not working
- Known limitation by using thinlinc in webbrowser - if possible use the native client.
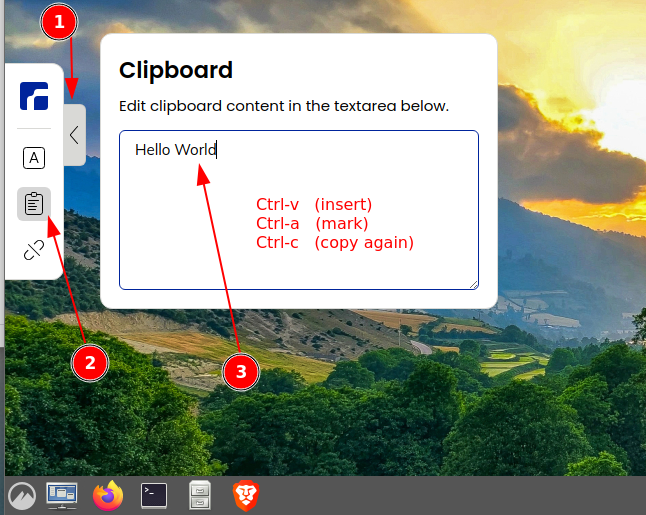
- Work around: open the menu on the left side > clipboard. Insert the clipboard, mark it, and copy it again to the clipboard - now it should be available via clipboard in any application.