
mailMerge
- Sending mass mail via Thunderbird with the add-on Mail Merge (already installed on the terminal servers).
- Database is a CSV File.
Quick Intro
- Create a receiver list as CSV File
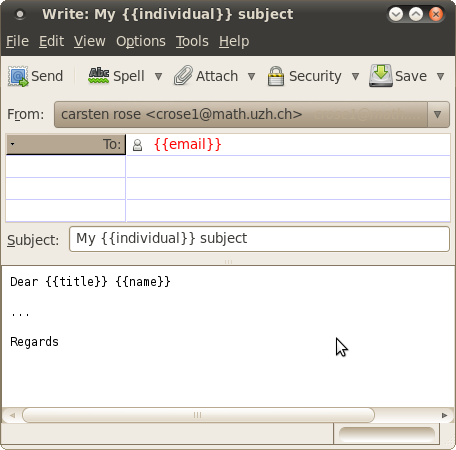
- Start to write the Mail. As receiver (field To) write
{{email}}. - Inside of the 'new mail'-window,
- click on menu:
File > Mail Merge.- Choose: Personal Mail
- Deliver Mode: Send Later
- Format: Plain Text
- Browse and select the CSV File (step 1) with all the receiver email addresses.
- Click OK.
- The 'new mail' window disappears.
- All mails will be generated and copied to
Local Folders > Outbox. Here you can check the mails. - To send all mails, click on
File > Send unsent messages
- click on menu:
- You'll find a copy of each mail in your send folder.
Detailed description
CSV file with receiver email addresses
- Create a CSV file (plain text file with "," as field separation). One line for each receiver.
- Use a generic Texteditor like
geditornedit. - Format Rules:
records are separated by line breaks (\r, \n, \r\n)
fields are separated by field delimiters (comma, semicolon, colon, tab)
fields may be enclosed within text delimiters (double quote, single quote, none)
fields with embedded line breaks must be enclosed within text delimiters
fields with embedded field delimiters must be enclosed within text delimiters
fields with embedded text delimiters must be enclosed within text delimiters
embedded text delimiters must be doubled
first record must contain columnnames
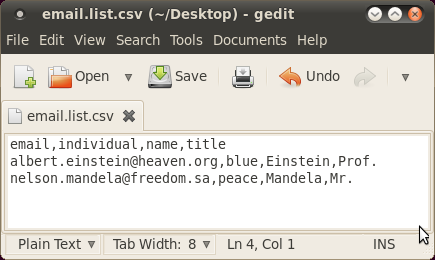
- Example CSV File:
email,individual,name,title
albert.einstein@heaven.org,blue,Einstein,Prof.
nelson.mandela@freedom.sa,peace,Mandela,Mr.
Write Mail
- Write the mail as you would normally do.
- In the
Tofield insert the name of the column of the CSV file which represents the receiver email address. - If necessary, insert further variable names (column names in the CSV file - no spaces in column names!).
- Optional: Save this mail (for later use) as a draft.
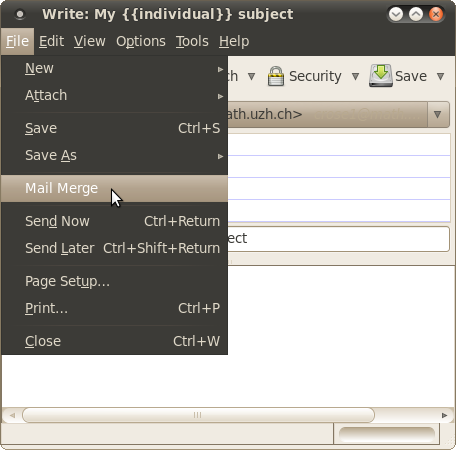
- Finish: Menu
File > Mail Merge.
Mail Merge
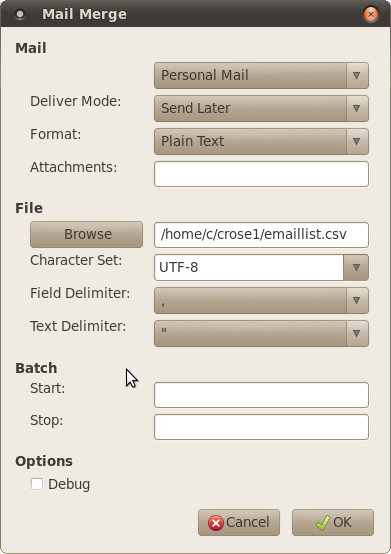
- Choose: Personal Mail
- Deliver Mode: Send Later
- Format: Plain Text
- Browse and select the CSV File (step 1) with all the receiver email addresses.
- Click OK.
- The 'new mail' window disappears.
- All mails will be generated and copied to
Local Folders > Outbox. Here you can check the mails.
Sending Mails
Mails:
- OK: Click on
File > Send unsent messages - Bad: delete all mails of the folder 'Outbox' and start again with writing the mail or use the previously saved draft.
Final
- You'll find a copy of each mail in your sent folder.