|
Size: 3236
Comment:
|
← Revision 73 as of 2024-03-27 11:22:45 ⇥
Size: 4861
Comment:
|
| Deletions are marked like this. | Additions are marked like this. |
| Line 1: | Line 1: |
| = Windows 2012 = |
## page was renamed from Windows2012 = Windows 2016 = |
| Line 6: | Line 6: |
If your IMATH account has been created before March 1st, 2014, you have to synchronize the Windows password for Windows 2012 before you can log in. This has to be done only once per account. |
If your IMATH account has been created before March 1st, 2014, you have to synchronize the Windows password for Windows 2016 before you can log in. This has to be done only once per account. |
| Line 11: | Line 10: |
| 1. go to [[https://www.math.uzh.ch/newpw]] | 1. go to https://www.math.uzh.ch/newpw |
| Line 16: | Line 15: |
| Once you finished above steps, your password has been synchronized and you can log into Windows 2012 using your IMATH account. | Once you finished above steps, your password has been synchronized and you can log into Windows 2016 using your IMATH account. |
| Line 19: | Line 18: |
Click on the Windows logo in the lower left hand corner You will see the Start Screen with a limited set of applications as shown below By scrolling on downwards you will find all applications (following screen shots) |
1. Click on the Windows logo in the lower left hand corner 1. You will see the Start Screen with a limited set of applications as shown below 1. By scrolling on downwards you will find all applications |
| Line 29: | Line 25: |
| Line 32: | Line 27: |
| {{attachment:explorer.png}} | {{attachment:2.png}} |
| Line 34: | Line 29: |
| Your personal data is in '''homes''' (circled red below) | Your personal data (home) is in '''\\peuler2\<shortname>''' |
| Line 36: | Line 31: |
| {{attachment:explorerhomes.png}} | Double-click the Path bar and insert the above. Note that <shortname> needs to be replaced with your shortname. (circled red below) |
| Line 38: | Line 33: |
| Shared data on Scratch is in '''Scratch (S:)''' | {{attachment:3.png}} |
| Line 40: | Line 35: |
| {{attachment:explorerscratch.png}} | Shared data on Scratch is in '''\\peuler2\s''' {{attachment:4.png}} '''__How to lock your Home aswell as the shared folder in place__''' Right-click Network and press "Map network drive": {{attachment:5.png}} '''__Shared Folder__''' Set '''S:''' as the Drive name and insert '''\\peuler2\s''' {{attachment:6.png}} '''__Home Folder__''' Set '''L:''' as the Drive name and insert '''\\peuler2\<shortname>''' {{attachment:7.png}} Once done, it should look like this: {{attachment:9.png}} |
| Line 43: | Line 62: |
| In order to sign out/log out, i.e. close all programs and end the sessions | |
| Line 44: | Line 64: |
| In order to sign out/log out, i.e. close all programs and end the sessions, click on the Start Button | 1. click on the Start Button 1. then click on the personalized icon (left side, see pink arrow) 1. a drop down list appears. Click on '''Sign out'''. |
| Line 48: | Line 70: |
| * and click on personalized icon (left side, small icon) * a drop down list appears. Click on '''Sign out'''. |
== Printer == all Institute printers should be automatically mapped to your windows session. |
| Line 51: | Line 73: |
| == Arange Windows Side-by-Side == | 1. Trouble shooting |
| Line 53: | Line 75: |
| Windows 2012 allows for easy side-by-side alignment of windows: | in case your selected printer disappeared after you disconnect/ reconnect your session |
| Line 55: | Line 77: |
| 1. click on the first window to be aligned 2. press the Diamond key (adjacent to the Space bar) and keep it pressed. Then press the Cursor Left key. The window will be aligned to the left side of the screen 3. click on the second window to be aligned 4. press the Diamond key and keep it pressed. Then press the Cursor Right key. Both windows are now aligned side-by-side (see below for example) |
* please perform a logout from your windows session https://wiki.math.uzh.ch/public/Windows2012#Sign_Out.2FLog_Out * You don’t need to perform the steps below as your (default)printer will be mapped after a fresh login again |
| Line 60: | Line 80: |
| {{attachment:side-by-side.png}} | == define your default printer == at first start-up please define you default printer as follow |
| Line 62: | Line 83: |
| == Sound and Video == Currently, sound and video is working, but performance depends on the current bandwidth available == Printer == * all Institute printers are automatically mapped to your winwdows sesssion * at first start-up please define you default printer as follow 1. Trouble shooting * in case your selected printer disappeared after you disconnect/ reconnect your session * please perform a logout from your windows session [[https://wiki.math.uzh.ch/public/Windows2012#Sign_Out.2FLog_Out]] * in this case you don’t need to perform the steps below as your printer will be mapped after a fresh login again |
* click in on the windows icon and type "devices" |
| Line 77: | Line 86: |
== find and select your printers == |
|
| Line 88: | Line 95: |
== Arange Windows Side-by-Side == Windows 2016 allows for easy side-by-side alignment of windows: 1. click on the first window to be aligned 1. press the "Windows" key (left/right and near the Space bar) and keep it pressed. Then press the Cursor Left key. The window will be aligned to the left side of the screen 1. click on the second window to be aligned 1. press the Windows" key and keep it pressed. Then press the Cursor Right key. Both windows are now aligned side-by-side (see below for example) {{attachment:side-by-side.png}} == Sound and Video == Sound and video is working, but performance may depends on the current bandwidth available == USB sticks == * If you plug in a USB Stick at the terminal, there is '''no window''', which opens automatically. * Plugged in USB sticks or ext. Harddrives will appear in your home-directory under the folder '''thindrives'''. * Open a 'explorer' and navigate to '''this PC -> media on ThinLinc ''' * Mount and unmount happens automatically - wait a few seconds. * If you copy data, wait until the light on the USB stick '''stops''' flashing or the '''progress bar''' disappear, plus some additional seconds. After that, it's secure to remove the stick. * If the stick does not appear under directory 'media on ThinLinc', please trigger a remount via menu on your Thinlinc Terminal (not on Windows) '''Applications > System Tools > Repair thindrives (USB Stick , ...) '''. * Note: on the Thinstations (they have a an orange startup screen) the USB Stick mount is not yet support == Screenshot == * https://www.heise.de/ratgeber/Die-Screenshot-Funktionen-in-Windows-10-und-11-6266290.html |
Windows 2016
Contents
First Time Login
If your IMATH account has been created before March 1st, 2014, you have to synchronize the Windows password for Windows 2016 before you can log in. This has to be done only once per account.
Follow the steps below in order to synchronize the password:
enter your user name and password for your IMATH account, and press Login
check the option Keep my old password and leave the fields New password and Retype new password empty.
press Set password. It may take up to 60 seconds for the change to happen.
Once you finished above steps, your password has been synchronized and you can log into Windows 2016 using your IMATH account.
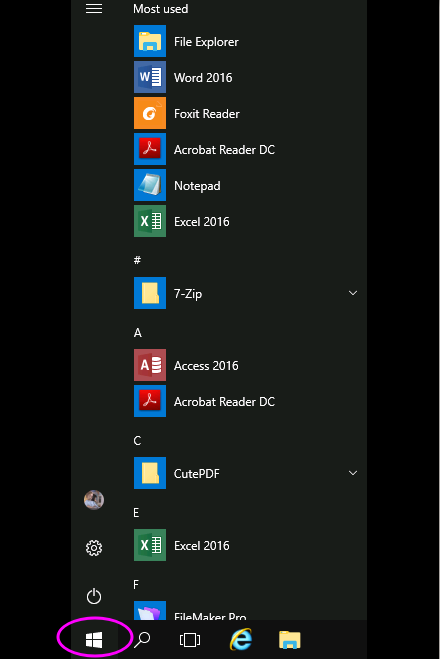
Where are the Applications?
- Click on the Windows logo in the lower left hand corner
- You will see the Start Screen with a limited set of applications as shown below
- By scrolling on downwards you will find all applications
Where are the Files?
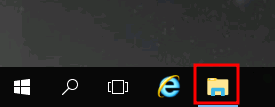
Start Windows Explorer (circled red)
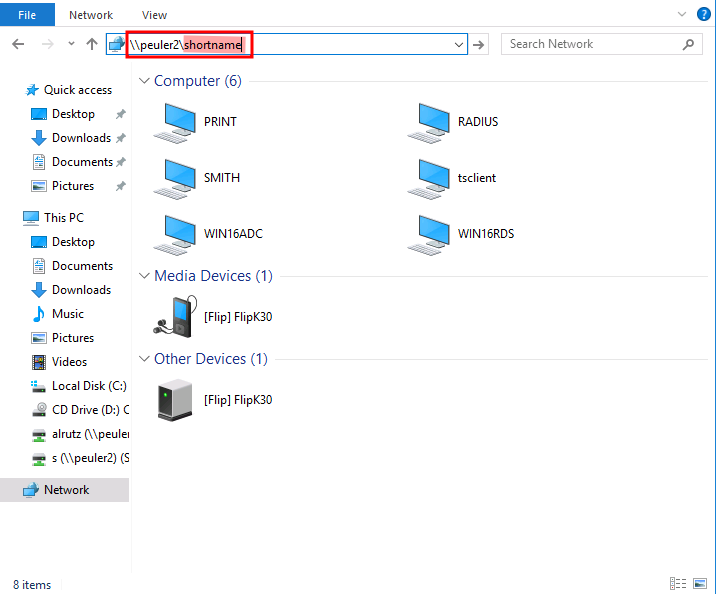
Your personal data (home) is in \\peuler2\<shortname>
Double-click the Path bar and insert the above. Note that <shortname> needs to be replaced with your shortname. (circled red below)
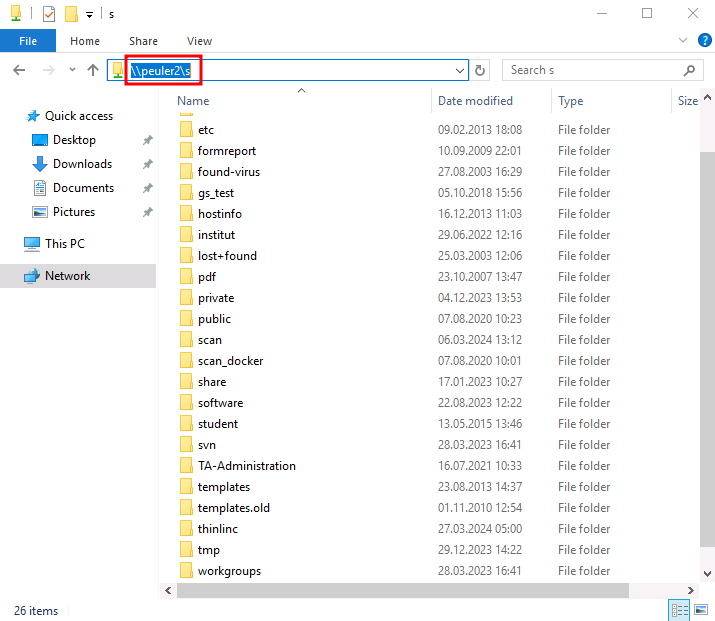
Shared data on Scratch is in \\peuler2\s
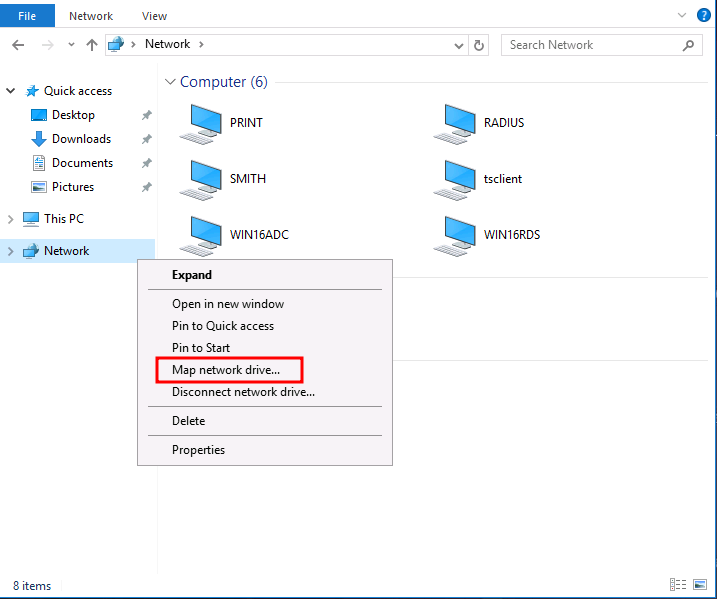
How to lock your Home aswell as the shared folder in place
Right-click Network and press "Map network drive":
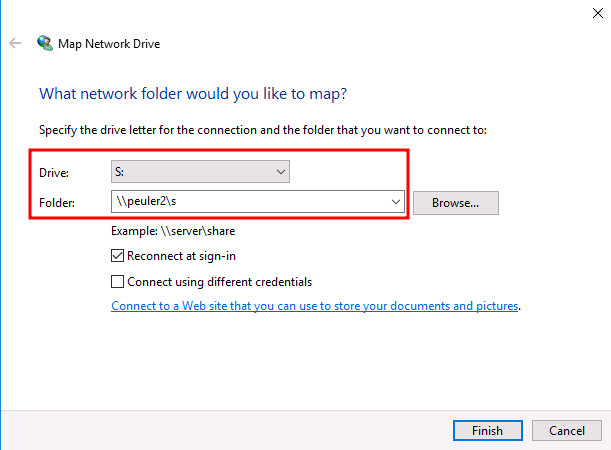
Shared Folder
Set S: as the Drive name and insert \\peuler2\s
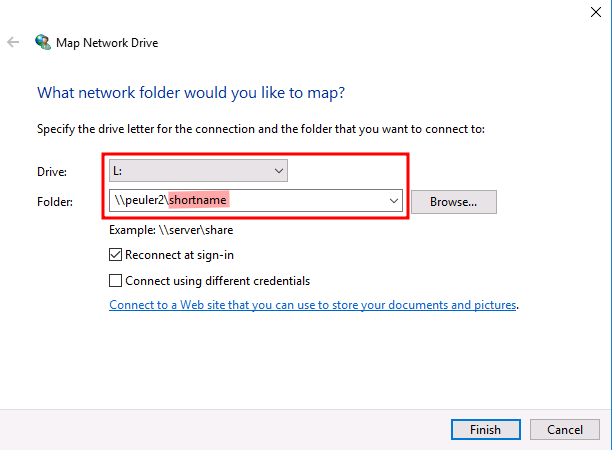
Home Folder
Set L: as the Drive name and insert \\peuler2\<shortname>
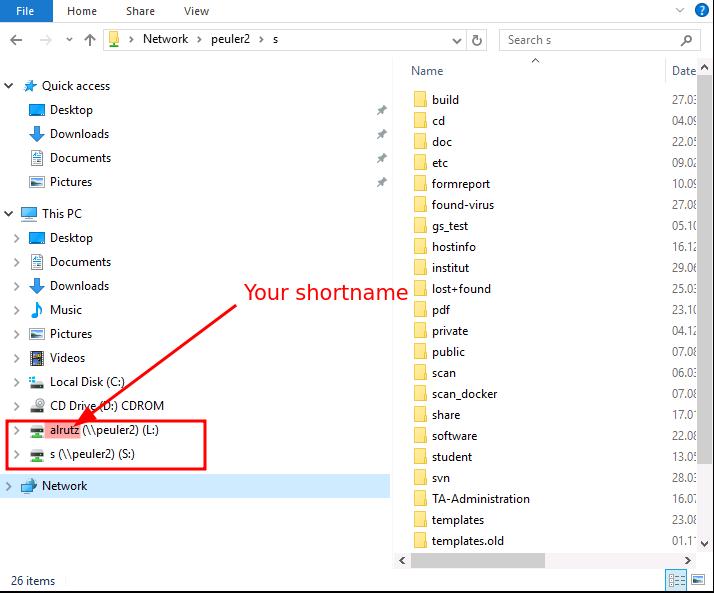
Once done, it should look like this:
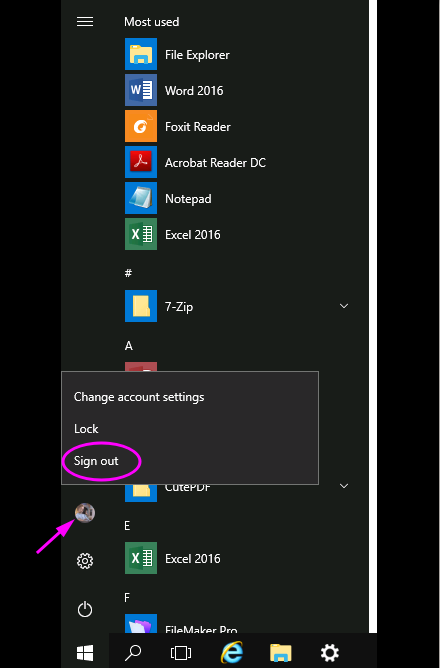
Sign Out/Log Out
In order to sign out/log out, i.e. close all programs and end the sessions
- click on the Start Button
- then click on the personalized icon (left side, see pink arrow)
a drop down list appears. Click on Sign out.
Printer
all Institute printers should be automatically mapped to your windows session.
1. Trouble shooting
in case your selected printer disappeared after you disconnect/ reconnect your session
please perform a logout from your windows session https://wiki.math.uzh.ch/public/Windows2012#Sign_Out.2FLog_Out
- You don’t need to perform the steps below as your (default)printer will be mapped after a fresh login again
define your default printer
at first start-up please define you default printer as follow
- click in on the windows icon and type "devices"
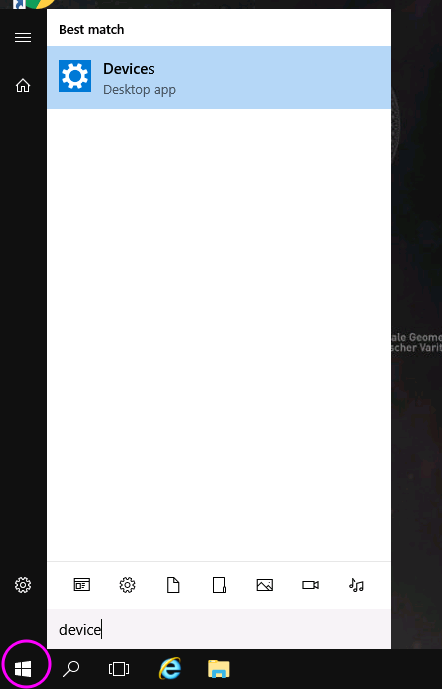
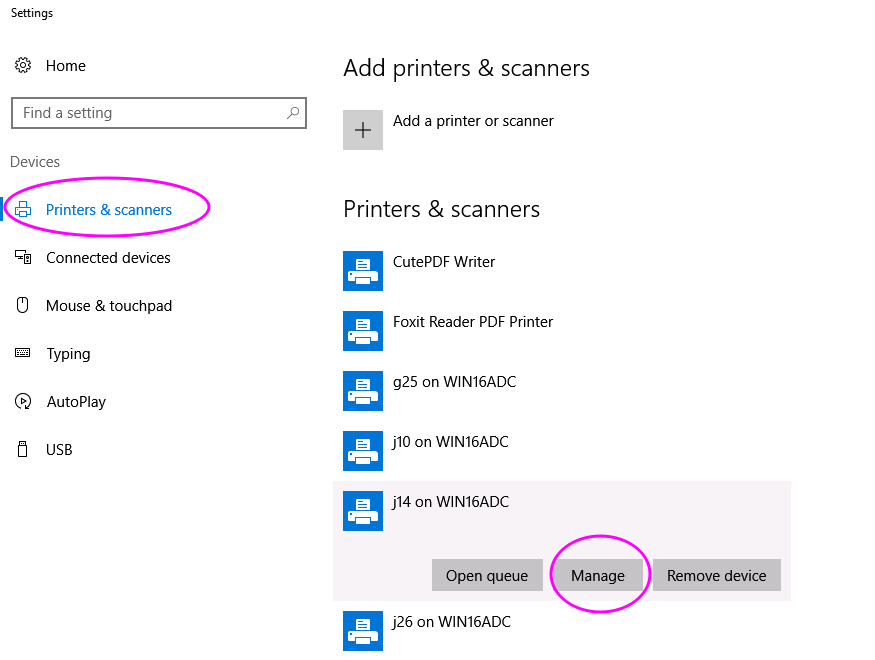
navigate to "Printers & Scanners"
- Select your required Printer and click on "Manage"
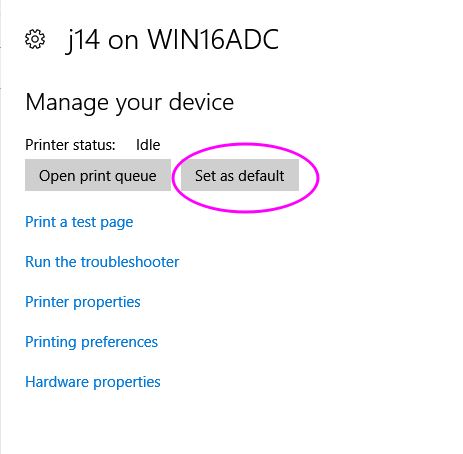
- click "Set as default" to assign this printer as default printer for all your applications
Arange Windows Side-by-Side
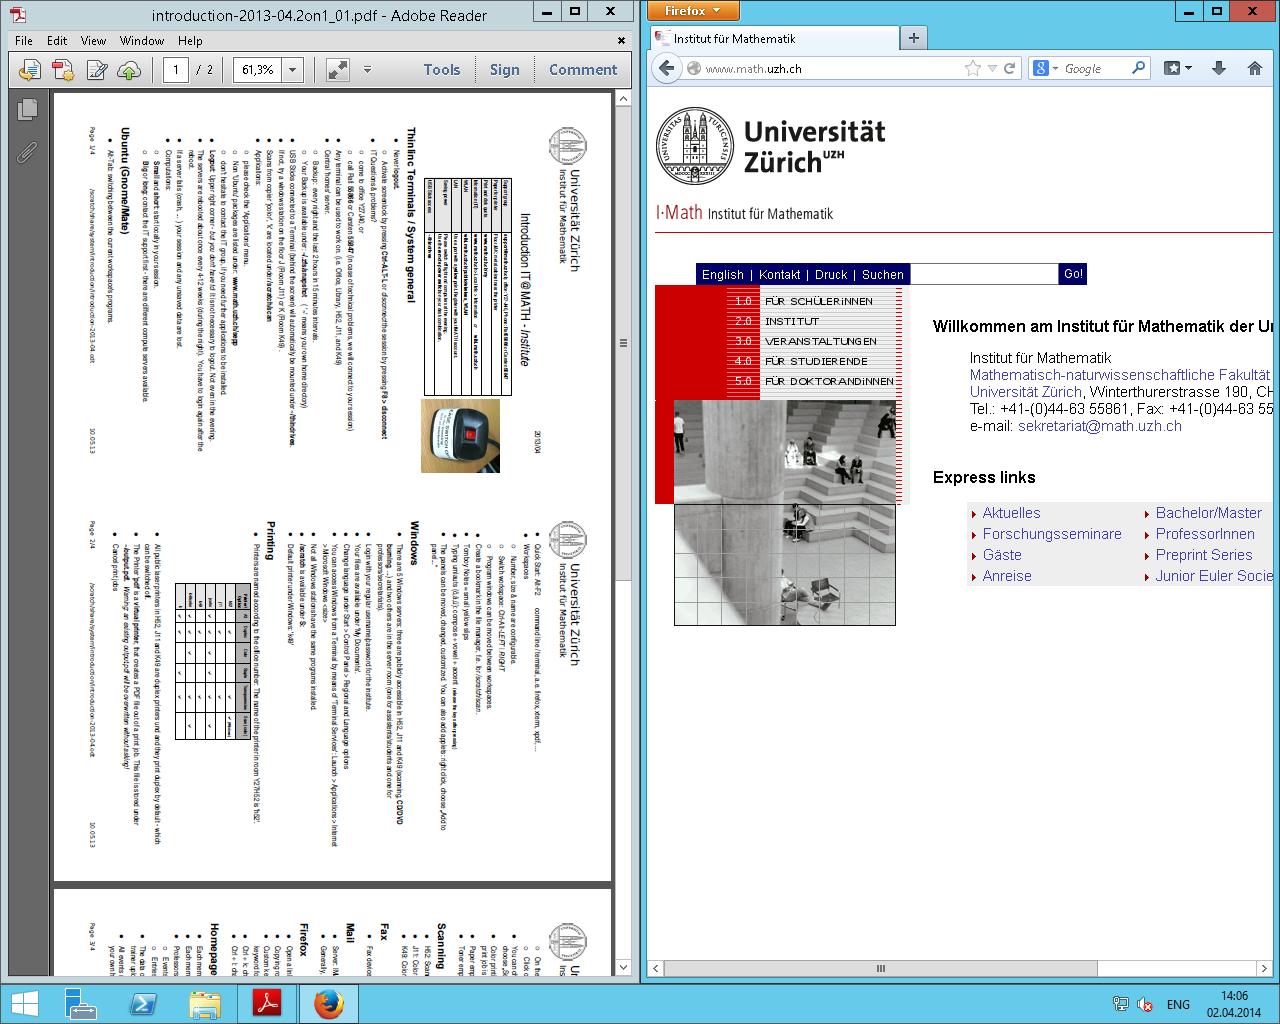
Windows 2016 allows for easy side-by-side alignment of windows:
- click on the first window to be aligned
- press the "Windows" key (left/right and near the Space bar) and keep it pressed. Then press the Cursor Left key. The window will be aligned to the left side of the screen
- click on the second window to be aligned
- press the Windows" key and keep it pressed. Then press the Cursor Right key. Both windows are now aligned side-by-side (see below for example)
Sound and Video
Sound and video is working, but performance may depends on the current bandwidth available
USB sticks
If you plug in a USB Stick at the terminal, there is no window, which opens automatically.
Plugged in USB sticks or ext. Harddrives will appear in your home-directory under the folder thindrives.
Open a 'explorer' and navigate to this PC -> media on ThinLinc
- Mount and unmount happens automatically - wait a few seconds.
If you copy data, wait until the light on the USB stick stops flashing or the progress bar disappear, plus some additional seconds. After that, it's secure to remove the stick.
If the stick does not appear under directory 'media on ThinLinc', please trigger a remount via menu on your Thinlinc Terminal (not on Windows) Applications > System Tools > Repair thindrives (USB Stick , ...) .
- Note: on the Thinstations (they have a an orange startup screen) the USB Stick mount is not yet support
