|
⇤ ← Revision 1 as of 2019-02-20 05:26:01
Size: 884
Comment:
|
Size: 2335
Comment:
|
| Deletions are marked like this. | Additions are marked like this. |
| Line 5: | Line 5: |
| * Possible Fileypes: '''PDF, PNG, JPG, R, Matlab, M''' - no office documents like MS-Word. | * Login with your UZH-Shortname, then proceed to lecture. |
| Line 7: | Line 7: |
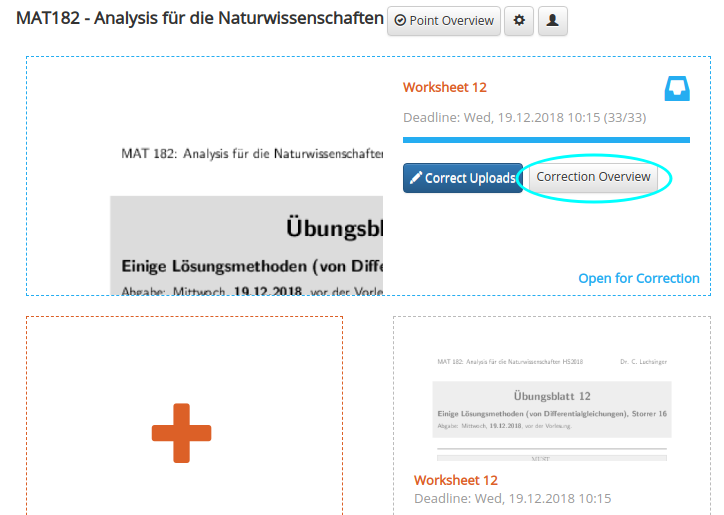
| * Start by clicking on Upload Solution | * For most cases, Correction Overview is the best starting point. |
| Line 10: | Line 10: |
| * Then you see an overview of your uploaded files. Here you can view all your uploads | == Correction Overview == The Correction Overview displays just the students and exercises assigned to you for correction. It also gives you a quick overview if you have corrected every exercise assigned to you. |
| Line 13: | Line 15: |
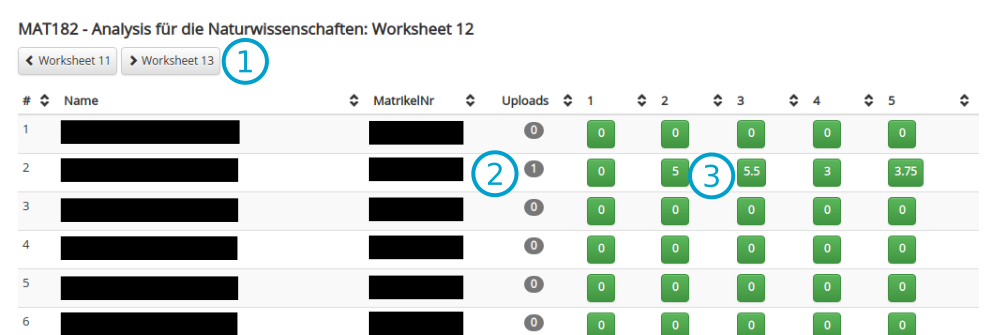
| * The upload dialogue currently has a seperate upload for PDF / Images and Other Files (R Code, Tex, Zip, etc.) After uploading don't forget to save the record (see the checked mark) | 1. Allows you to switch between Worksheets 2. Shows you how many files the student has uploaded. 3. This button links directly to the correction view of the student at said exercise. The button is blue without a number when you haven't given any points and turns green with the number of points after you have corrected the exercise. == Correction View == Here you see all the files a student has uploaded to a given worksheet. Note that if you divided each worksheet in different exercises, all uploads are shown all the time. You have to pick out the correct upload for the exercise yourself. It is helpful to ask student to write the exercise number of a sheet at the top of each page. |
| Line 15: | Line 23: |
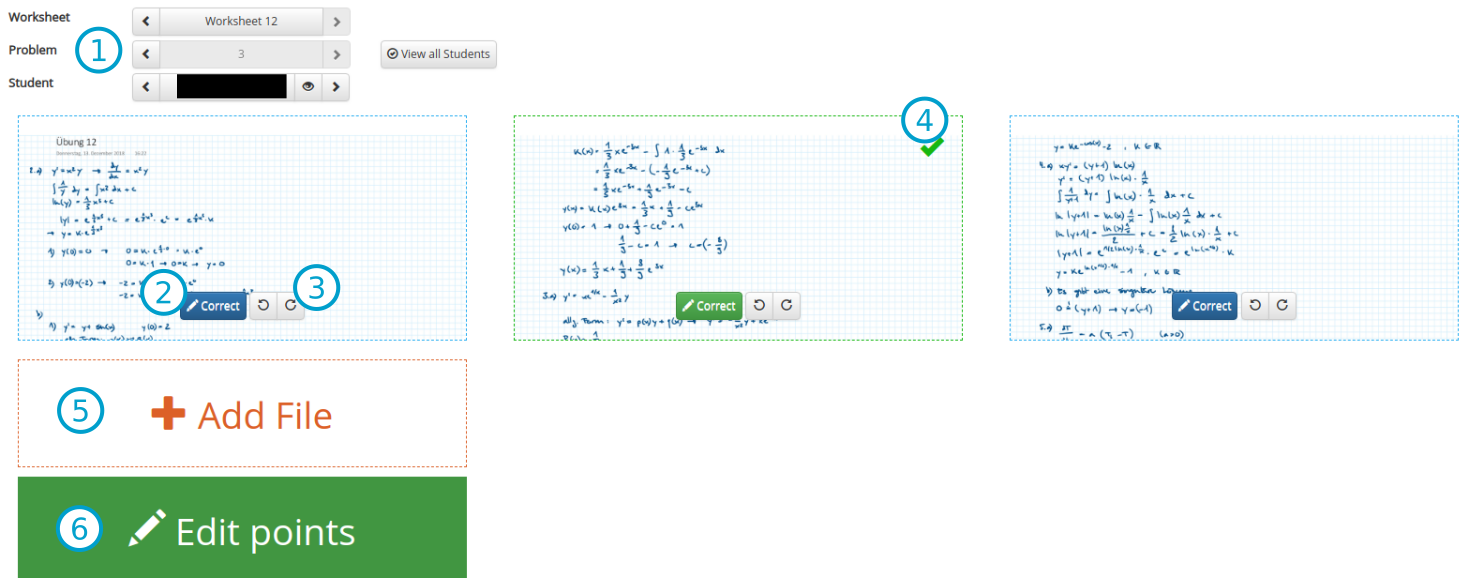
1. Here you can switch between Worksheets, Problems (Exercises) and Students. It also links to the student overview (Warning: in modules with many students, this page is very slow.) 2. This buttons brings you directly to the correction page, where you can edit the page and leave your notes. 3. The two buttons allow you to rotate the page, if it was uploaded sideways. 4. The green border and the completion mark shows that this page has been corrected. 5. In case the student couldn't upload a file and send it to you per email, you can add it here. 6. This button is blue with the text "Give Points" when the problem hasn't been graded. As soon as their are points assigned, it switches to green with the text "Edit Points". Use this to grade the exercise after you left your notes on the pages. |
Student Upload
- Login with your UZH-Shortname, then proceed to lecture.
- For most cases, Correction Overview is the best starting point.
Correction Overview
The Correction Overview displays just the students and exercises assigned to you for correction. It also gives you a quick overview if you have corrected every exercise assigned to you.
- Allows you to switch between Worksheets
- Shows you how many files the student has uploaded.
- This button links directly to the correction view of the student at said exercise. The button is blue without a number when you haven't given any points and turns green with the number of points after you have corrected the exercise.
Correction View
Here you see all the files a student has uploaded to a given worksheet. Note that if you divided each worksheet in different exercises, all uploads are shown all the time. You have to pick out the correct upload for the exercise yourself. It is helpful to ask student to write the exercise number of a sheet at the top of each page.
- Here you can switch between Worksheets, Problems (Exercises) and Students. It also links to the student overview (Warning: in modules with many students, this page is very slow.)
- This buttons brings you directly to the correction page, where you can edit the page and leave your notes.
- The two buttons allow you to rotate the page, if it was uploaded sideways.
- The green border and the completion mark shows that this page has been corrected.
- In case the student couldn't upload a file and send it to you per email, you can add it here.
- This button is blue with the text "Give Points" when the problem hasn't been graded. As soon as their are points assigned, it switches to green with the text "Edit Points". Use this to grade the exercise after you left your notes on the pages.
- As long as the deadline is still open you can edit all your uploads and change the files if needed or delete them.
- As long as the deadline is still open you can edit all your uploads and change the files if needed or delete them.


