|
Size: 3066
Comment:
|
← Revision 29 as of 2015-04-28 07:19:04 ⇥
Size: 3065
Comment:
|
| Deletions are marked like this. | Additions are marked like this. |
| Line 6: | Line 6: |
You will find the program needed to scan documents on the desktop. * Insert the paper you want to scan facing down in the paper feed on top or inside the lid. |
* Login on the windows computer. * Use your I-MATH Account (typically your 'uzh_shortname'). * If the login fails, check http://www.math.uzh.ch/account * Insert the paper * facing down in the ADF (automatic document feeder), or * inside the lid. |
| Line 11: | Line 14: |
| Line 41: | Line 45: |
| * You may to activate your Account first: www.math.uzh.ch/account this is true if you either use our enviroment the first time or your account was renamed from s-account to uzh shortname. | * Check: http://www.math.uzh.ch/account |
| Line 44: | Line 49: |
| Line 45: | Line 51: |
| * The manual tray can handle up to 40 pages according to Manufacturer. * How can I use OCR? * The Epson GT-1500 doesn't support OCR. * For other problems, feel free to contact the IT at Y29J40 |
* The ADF can handle up to 40 pages according to Manufacturer. * I can't mark the text to copy/paste. How can I use OCR? * Do an OCR over the scan by using 'SimpleOCR' * For other problems, feel free to contact the IT at Y27-J40 |
Scanner
From the windows workstation in H52 you can scan your documents using the Epson GT-1500 scanner. Simply login to windows using your uzh_shortname and password.
Scanning Documents
- Login on the windows computer.
- Use your I-MATH Account (typically your 'uzh_shortname').
If the login fails, check http://www.math.uzh.ch/account
- Insert the paper
- facing down in the ADF (automatic document feeder), or
- inside the lid.
- Press the power button on the scanner, if not yet active.
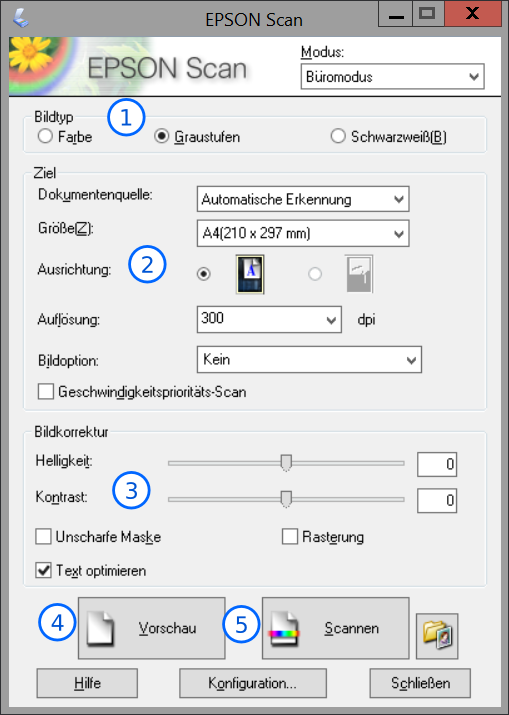
- Open "Epson Scan" on the desktop.
Epson Scan
Options about the type of the image from left to right: Color, Greyscales, Black & White
- Various Options about the source and the output file. (Size, Orientation, dpi) To get the best result untick "Geschwindigkeitsprioritäts-Scan" (Speed optimized scan)
- Picture Correction: You can change brightness and contrast settings here. Recommended option: "Text Optimierung" (Text optimization) for Text documents.
- "Vorschau" (Preview) shows you a low quality preview image, in which you can adjust the scan area with your mouse. Simply drag a rectangle with pressed down left mouse button over the area. You can move and adjust after you release the left mouse button. To draw a new one just start again from outside the current rectangle.
- Scannen (scan) Opens a dialogue on where and in which format you want to save the image.
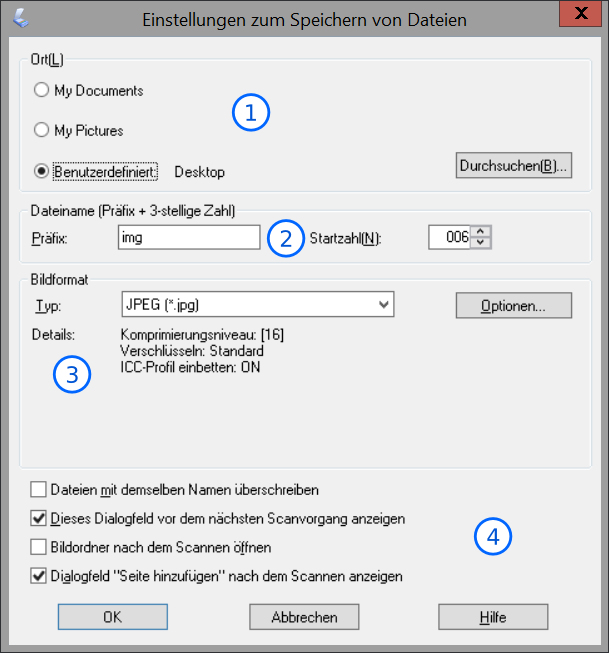
Save as dialogue
- Choosing the destination file. Use "Benutzerdefiniert" (Custom) and click on "Durchsuchen" (Browse) and select the path you want to save the image in.
- The "Praefix" (Prefix) is a fixed first part of your destination images name. The other indicates the current number that will be added.
- In this section you can choose the picture format. Generally JPEG and TIFF are good for printing purposes, TIFF is cleaner, PNG would be a clean and good looking format if you mainly use the picture digital.
- Untick the third box if you don't want the target folder to open every scan. The second tick means that you see this dialogfield the next time again. Leave the last one ticked as long as you need to scan more pages.
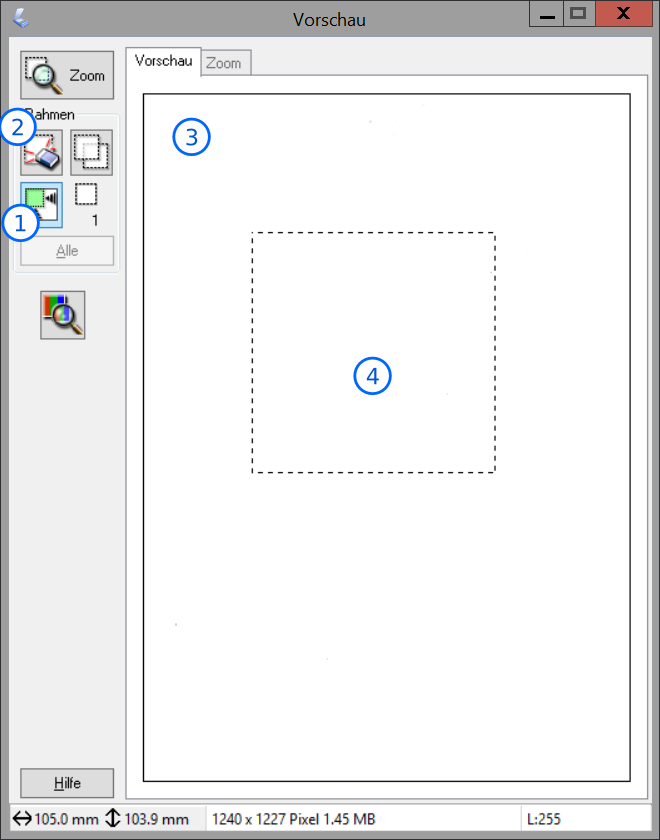
Adjust scan area dialogue
- Auto detect the edges of the page.
- Delete your current selection.
- The preview window with the example scan in it.
- The actual selected area to scan. You can move it around or reset it. Close when you are done.
FAQ
- I can't login with my uzh shortname.
- It only scans part of the page
- See Instruction at both at paragraph 3.
- How many sheets of papers can the manual tray handle?
- The ADF can handle up to 40 pages according to Manufacturer.
- I can't mark the text to copy/paste. How can I use OCR?
- Do an OCR over the scan by using 'SimpleOCR'
- For other problems, feel free to contact the IT at Y27-J40


