|
Size: 2301
Comment:
|
Size: 13205
Comment:
|
| Deletions are marked like this. | Additions are marked like this. |
| Line 1: | Line 1: |
| = Setup = | = SeminarLive = <<TableOfContents>> |
| Line 3: | Line 4: |
| Before an event (e.g. a lecture) can be streamed with SeminarLive, it needs to be created and configured on https://seminarlive.math.uzh.ch. ''Note: I-MATH Lectures can be imported automatically'' |
'''''Overview: ''''' ||'''Feature''' ||'''Note''' || ||URL || https://seminarlive.mnf.uzh.ch || ||Technical Issues || support@math.uzh.ch, Urgent situation: Phone 55847 (C.Rose) || ||Streaming || Any recent browser like Google Chrome (recommended), Firefox, Safari || ||Recording || Incl. switching between several recorded streams || ||Blackboard || Quality with 4k Cams (good readable) || ||Screenshare || Tablet, Notebook (Win, Mac, Linux) || ||Microphone || Ceiling microphone installed in seminar room - no additional microphone needed. || ||Access control || Public, UZH authenticated, self registration, group password || ||Chat || all to all || ||Rooms installed || '''Y11-F06, Y25-H79, Y27-H12, Y27-H25, Y27-H28, Y27-H36, Y27-H46, Y27-H52, Y34-J01, Y34-J02, Y36-K08, Y42-K88''' || ||Introduction ||[[https://collab.math.uzh.ch/playback/presentation/2.0/playback.html?meetingId=be3b5dcb887cf4d379e014e9cb2cd454d4074620-1645096921634|Video 17.2.2022]] || |
| Line 6: | Line 18: |
| Log in at https://seminarlive.math.uzh.ch/semlive/index.php?id=login with your UZH account. If you do not have a UZH account, use the https://seminarlive.math.uzh.ch/semlive/index.php?id=registration to create a SeminarLive account and then log in with this account. |
= Viewer access to SeminarLive = == MNF == * Communicate the following URL, updated to lecture and semester, to all participants. * Replace `<module>` and `<semester>` in: {{{ https://seminarlive.math.uzh.ch/semlive/index.php?id=module&module=<module>&semester=<semester> }}} * Example for module MNF123 in spring semester 2022: {{{ https://seminarlive.math.uzh.ch/semlive/index.php?id=module&module=MNF123&semester=fs22 }}} == I-MATH == '''Only for lectures of I-MATH events''' To activate the automatic linking from I-MATH lecture homepage to !SeminarLive, please activate `SeminarLive` on the streaming tab in https://w3.math.uzh.ch/my. See also: https://wiki.math.uzh.ch/math/LI_Lecture_Streaming for streaming (log in on the upper right corner). = Speaker = == Login / Role == * Every person with an UZH Account (webpass) can log in. * Non UZH persons can create local acount via Email registration and password set. * Roles: * Viewer: everyone * Speaker: any person who is assigned as a speaker to lecture get's the speaker role automatically. If not, ask your !SeminarLive staff (typically IT Koordinator or Didaktik Koordinator). * Staff: individually assigned by I-MATH. == Stream lecture/seminar: setup == * Per event (=lecture/seminar) enable the stream / recording / access options and configure dates/rooms (see below). * Role needed: Speaker, Staff * Via Webinterface. * All regular UZH lectures / seminars should already be prepared in the database, but not activated. * Extra events can be configured as well |
| Line 10: | Line 54: |
| wip | 1. Navigate to the '''My Events page''' 1. If you have one or more events that can be imported (I-MATH lectures and exercises), you will see them as shown in the image below. . {{attachment:event_import.png||align="middle"}} 1. Click 'Import'. |
| Line 13: | Line 60: |
| To create an event, follow these steps | To create an event manually, follow these steps |
| Line 15: | Line 62: |
| 1. Navigate to the '''My Events page''' (https://seminarlive.math.uzh.ch/semlive/index.php?id=my_events) 2. Click on the '''Create Event''' link. If you already have at least one event listed on the page, use the '''+''' button instead. If you see neither the link nor the button, then you are most likely missing privileges - in this case please contact support.math.uzh.ch. 3. The form shown in the image below below appears. [[attachment:create_event_general.jpg]] a. ''Type'': The type of event: Lecture, Exercise or Seminar. If you pick exercise, then you will also have to select the lecture or seminar for which the exercise is done. b. ''Semester'': The Semester in which you want to stream. c. ''Module'': The module name of your lecture d. ''Default Room'': The room in which the event is usually held. The room can later be adjusted per occurrence of the event, but by default the ''Default Room'' will be used. e. ''Lecture Name'': The name of the lecture f. ''Description'': An optional description of the event (e.g. what is the lecture about? g: ''Show on "Browse Events"'': If this box is checked, then your event will be '''publicly visible on the Browse Events page''' (https://seminarlive.math.uzh.ch/semlive/index.php?id=browse_events) h: ''Speakers'': All speakers for the event are shown here. When you save the event for the first time, you will be automatically added to the speaker list. After this, you will be able to add more speakers. All Speakers can edit the event and will automatically be granted all privileges on the Streaming Interface of the event. (e.g. Turning the blackboard camera and other devices on/off) |
1. Navigate to the '''My Events page''' 1. Click on the '''Create Event''' link. If you already have at least one event listed on the page, use the '''+''' button instead. . If you see neither the link nor the button, then you are most likely missing privileges - in this case please contact support.math.uzh.ch. 1. The form shown in the image below below appears. . {{attachment:create_event_general.jpg||align="middle"}} * ''a) Type'': The type of event: Lecture, Exercise or Seminar. If you pick exercise, then you will also have to select the lecture or seminar for which the exercise is done. * ''b) Semester'': The Semester in which you want to stream. * c) ''Module'': The module name of your lecture * ''d) Default Room'': The room in which the event is usually held. The room can later be adjusted per occurrence of the event, but by default the ''Default Room'' will be used. * ''e) Lecture Name'': The name of the lecture * ''f) Description'': An optional description of the event (e.g. what is the lecture about? * ''g) Show on "Browse Events"'': If this box is checked, then your event will be '''publicly visible on the Browse Events page''' * ''h) Speakers'': All speakers for the event are shown here. When you save the event for the first time, you will be automatically added to the speaker list. After this, you will be able to add more speakers. All Speakers can edit the event and will automatically be granted all privileges on the Streaming Interface of the event. (e.g. Turning the blackboard camera and other devices on/off) |
| Line 29: | Line 76: |
| = Streaming Interface= | === Streaming and Recording Settings === In the tab ''Streaming'' you can adjust the following settings: |
| Line 31: | Line 79: |
| wip | {{attachment:streaming01.png||align="middle"}} * a) ''Stream this event live?'': '''not implemented''' - livestream is enabled for all events. * b) ''Who has access to the livestream?'': Note that multiple options can be selected. Only one of them needs to be true to grant access to a user . * ''Anyone'': Anyone will be able to access the stream . * ''Logged in users'': People can only access the livestream after they have logged in on !SeminarLive . * ''Users who know the password'': If you check this box, you will see a field where you can enter a password. People will be prompted to enter the password before they have access to your stream. * c) ''Record stream'': Whether or not the stream should be recorded. * d) ''Who has access to the recordings?'': Note that multiple options can be selected. Only one of them needs to be true to grant access to a user . * ''Anyone'': Anyone will be able to watch the recordings . * ''Logged in users'': People can only watch the recordings after they have logged in on !SeminarLive . * ''Users who know the password'': If you check this box, you will see a field where you can enter a password. People will be prompted to enter the password before they can watch the recordings. === Creating a Schedule === In the tab ''Schedule'' you can now define when exactly the event will be held. At the moment there are no occurrences of this event. {{attachment:create_event_schedule_empty.jpg||align="middle"}} Click the '''+''' Button to create the first occurrence of the event. Then configure the occurrence (which is called a ''meeting'' here): {{attachment:create_meeting.jpg||align="middle"}} * a) ''Name'': By default this is the same as the event's name. However, you might want to enter a keyword that describes what exactly the lecture is about on that specific date. * b) ''Room'': By default this is the ''Default Room'' you have set before on the Event. Select another room if the event does not take place in the default room on that date. * c) ''Start'': Date and time when the event starts * d) ''End'': Date and time when the event ends Save the form. You should now see your event: {{attachment:create_event_schedule_1.jpg||align="middle"}} Let's assume the event should occurr once a week, for 14 weeks. At the moment there is only one occurrence. To create the remaining occurrences, edit the meeting (Pencil icon) and then switch to the ''Recurrence'' tab. {{attachment:meeting_recurrence.jpg||align="middle"}} Click '''Repeat this meeting'''. The form in the image below will open. To create the remaining 13 occurrences of the event, configure the as shown: {{attachment:meeting_recurrence_2.jpg||align="middle"}} Once this form is saved, multiple meetings are created using the chosen options. You will land on the Detail page of your event. If everything went right, you should see this message: {{attachment:meeting_recurrence_3.jpg||align="middle"}} == Streaming == === Starting the Stream (Speaker / Assistant) === The event can be streamed once its schedule has been created. The speaker of the event can turn on (and off) devices in the room with the click of a button. This can either be done in a browser (e.g. on a laptop or computer) or on the !SeminarLive touchpad. Both ways are described below. === In the Browser === 1. Navigate to the '''My Events page''' (Login required) 1. a) Click the Join Button on the left side in the 'Today's Meetings' section {{attachment:todays_meetings.png||align="middle"}} b) OR: alternatively you can open the detail page of your event by clicking the magnifying glass. On this page you can see the whole schedule of your event. At the top, in the 'Upcoming' section, you can click 'Join' to open the streaming page. {{attachment:event_detail.png||align="middle"}} {{attachment:upcoming.png||align="middle"}} 1. Click the button shown in the picture below. You will now see all devices in the room which can be turned on and off. Toggle the switches next to the device's name to turn it on/off. {{attachment:devices_browser.png||align="middle"}} === On the Touch === 1. Log in by holding your UZH card to the backside of the Touch. If this is the first time you are using your card to log in, you will be prompted to enter your UZH/SeminarLive username and password. Otherwise you will be logged in immediately. Alternatively, you can log in without your card, by clicking 'Login' and then entering your UZH/SeminarLive username and password. 1. Join the 'Meeting' by clicking 'Join'. {{attachment:touch_join.png||align="middle"}} 1. Toggle the button next to a device's name to toggle it on or off. The device's stream (e.g. the blackboard camera) will be visible in the meeting a few seconds after turning it on. {{attachment:touch_devices.png||align="middle"}} = Streaming Interface = The streaming interface for !SeminarLive looks and works as shown and explained below. {{attachment:streaming_client.jpg||align="middle"}} * a) '''Mute / Unmute yourself'''. The first time you unmute yourself, your browser will ask for permission to access your microphone. Confirm this with ''yes''. When you are unmuted, you can also adjust your own volume. * b) '''Share your camera''' (e.g. built in camera of a laptop/mobilee device or a webcam) * c) '''Share your screen'''. You can share multiple screens simultaneously. Please note that screensharing might not be possible on tablets and mobile phones. * d) '''Show Devices in the Room''' such as Blackboard Camera, Ceiling Microphones, etc. By turning a switch, each device can be turned on / off individually. This option is only available to the host. * e) '''Raise Hand'''. Click this to signal that you have a question. Other participants will see the hand icon next to your name. You can click it again to lower the hand. The host of the meeting is able to lower any hands. * f) '''Follow Speaker'''. If you turn ''Follow Speaker mode'' on, then you will always see the stream which is currently selected by the speaker. This is useful if the speaker is using multiple streams (e.g. Camera, Blackboard, ...) to explain something. If this is turned off, then you will have to manually click on a stream's thumbnail to see it in high quality. * g) '''Show/Hide Participant Panel''' Click this to show/hide the panel with all participants in the top right. * h) '''Show/Hide Chat Panel''' Click this to show/hide the chat. * i) '''Leave Meeting''' Leave the meeting and return to the previous page * j) '''Enter Fullscreen'''. Leave Fullscreen by cliicking the icon again or by hitting ESC. * k) '''Search Participant''' in the list below * l) '''Participant Panel Settings''' Contains an option to quickly expand/collapse all stream thumbnails. More options will come in the future. * m) '''Shows the Role of a participant'''. White speeach bubble = ''Speaker'', golden speech bubble = ''host''. * n) '''Mute or unmute another user'''. This has no effect for other participants, only for yourself. * o) '''Participant Settings'''. Contains multiple settings: Adjust volume of participant, grant/revoke speaker privilege (Host only), more settings in the future. * p) '''Thumbnail'''. The thumbnail of a stream that is shared in the meeting. Thumbnails appear for cameras and screenshares. They can be clicked to display the high quality stream. The arrow symbol in the top right corner of the thumbnail can be clicked to expand or collapse the thumbnail. * q) '''Chat''' = Known Problems = * Audio / Video Shift * Livestream: there is a 1-2 second shift between video and audio. One reason is the 4k blackboard camera - this is hardware related. * Recording: unfortunately the shift between video and audio is not constant (it seems there is a relation between shift and length of the recording). * Apple Safari * We have reports from Apple Safari users about audio breaks in recordings every 1-2 seconds - Google Chrome seems to be fine. == To be implemented == * Speaker remote, student on-site: starting beamer and audio in seminar room from remote - we're working on it, should be ready in the first weeks of HS22. * Automatic import of student per lecture. * Unattended start / stop of recording * Offer access to recordings after a defined period of time (students should not have access to the recordings on the same day). * Chat: Emoticons (for votes) * Rooms to be installed: !Y27H26 |
SeminarLive
Overview:
Feature |
Note |
URL |
|
Technical Issues |
support@math.uzh.ch, Urgent situation: Phone 55847 (C.Rose) |
Streaming |
Any recent browser like Google Chrome (recommended), Firefox, Safari |
Recording |
Incl. switching between several recorded streams |
Blackboard |
Quality with 4k Cams (good readable) |
Screenshare |
Tablet, Notebook (Win, Mac, Linux) |
Microphone |
Ceiling microphone installed in seminar room - no additional microphone needed. |
Access control |
Public, UZH authenticated, self registration, group password |
Chat |
all to all |
Rooms installed |
Y11-F06, Y25-H79, Y27-H12, Y27-H25, Y27-H28, Y27-H36, Y27-H46, Y27-H52, Y34-J01, Y34-J02, Y36-K08, Y42-K88 |
Introduction |
Viewer access to SeminarLive
MNF
- Communicate the following URL, updated to lecture and semester, to all participants.
Replace <module> and <semester> in:
https://seminarlive.math.uzh.ch/semlive/index.php?id=module&module=<module>&semester=<semester>
- Example for module MNF123 in spring semester 2022:
https://seminarlive.math.uzh.ch/semlive/index.php?id=module&module=MNF123&semester=fs22
I-MATH
Only for lectures of I-MATH events
To activate the automatic linking from I-MATH lecture homepage to SeminarLive, please activate SeminarLive on the streaming tab in https://w3.math.uzh.ch/my. See also: https://wiki.math.uzh.ch/math/LI_Lecture_Streaming for streaming (log in on the upper right corner).
Speaker
Login / Role
- Every person with an UZH Account (webpass) can log in.
- Non UZH persons can create local acount via Email registration and password set.
- Roles:
- Viewer: everyone
Speaker: any person who is assigned as a speaker to lecture get's the speaker role automatically. If not, ask your SeminarLive staff (typically IT Koordinator or Didaktik Koordinator).
- Staff: individually assigned by I-MATH.
Stream lecture/seminar: setup
- Per event (=lecture/seminar) enable the stream / recording / access options and configure dates/rooms (see below).
- Role needed: Speaker, Staff
- Via Webinterface.
- All regular UZH lectures / seminars should already be prepared in the database, but not activated.
- Extra events can be configured as well
Event Import
Navigate to the My Events page
- If you have one or more events that can be imported (I-MATH lectures and exercises), you will see them as shown in the image below.
- Click 'Import'.
Creating an Event
To create an event manually, follow these steps
Navigate to the My Events page
Click on the Create Event link. If you already have at least one event listed on the page, use the + button instead.
- If you see neither the link nor the button, then you are most likely missing privileges - in this case please contact support.math.uzh.ch.
- The form shown in the image below below appears.
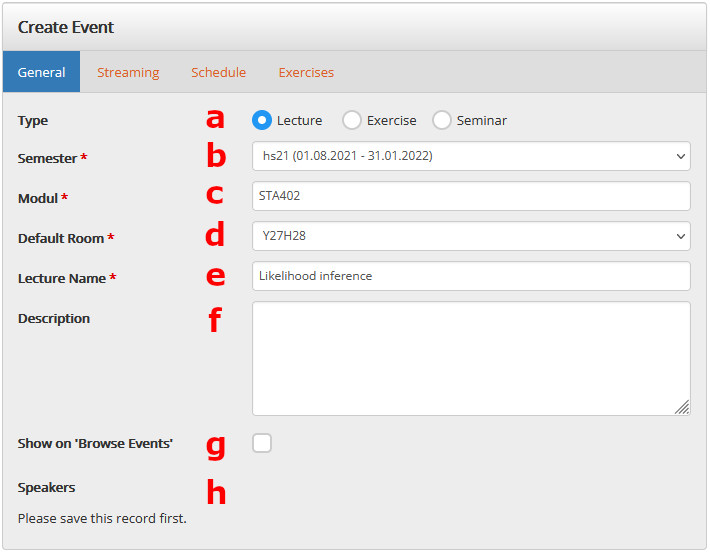
a) Type: The type of event: Lecture, Exercise or Seminar. If you pick exercise, then you will also have to select the lecture or seminar for which the exercise is done.
b) Semester: The Semester in which you want to stream.
c) Module: The module name of your lecture
d) Default Room: The room in which the event is usually held. The room can later be adjusted per occurrence of the event, but by default the Default Room will be used.
e) Lecture Name: The name of the lecture
f) Description: An optional description of the event (e.g. what is the lecture about?
g) Show on "Browse Events": If this box is checked, then your event will be publicly visible on the Browse Events page
h) Speakers: All speakers for the event are shown here. When you save the event for the first time, you will be automatically added to the speaker list. After this, you will be able to add more speakers. All Speakers can edit the event and will automatically be granted all privileges on the Streaming Interface of the event. (e.g. Turning the blackboard camera and other devices on/off)
Streaming and Recording Settings
In the tab Streaming you can adjust the following settings:
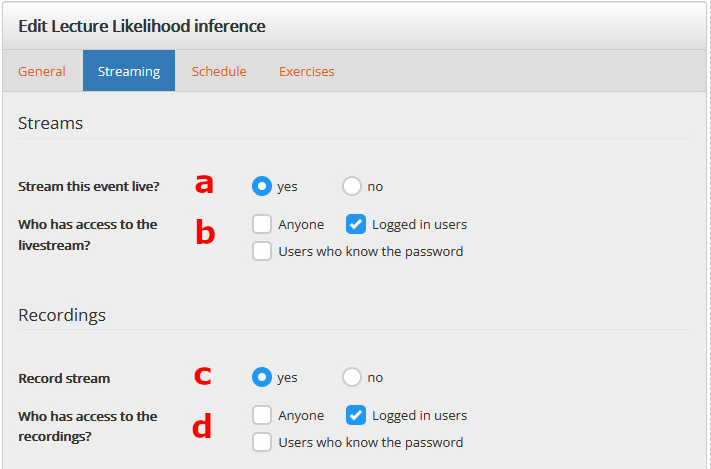
a) Stream this event live?: not implemented - livestream is enabled for all events.
b) Who has access to the livestream?: Note that multiple options can be selected. Only one of them needs to be true to grant access to a user
* Anyone: Anyone will be able to access the stream
* Logged in users: People can only access the livestream after they have logged in on SeminarLive
* Users who know the password: If you check this box, you will see a field where you can enter a password. People will be prompted to enter the password before they have access to your stream.
c) Record stream: Whether or not the stream should be recorded.
d) Who has access to the recordings?: Note that multiple options can be selected. Only one of them needs to be true to grant access to a user
* Anyone: Anyone will be able to watch the recordings
* Logged in users: People can only watch the recordings after they have logged in on SeminarLive
* Users who know the password: If you check this box, you will see a field where you can enter a password. People will be prompted to enter the password before they can watch the recordings.
Creating a Schedule
In the tab Schedule you can now define when exactly the event will be held. At the moment there are no occurrences of this event.

Click the + Button to create the first occurrence of the event. Then configure the occurrence (which is called a meeting here):
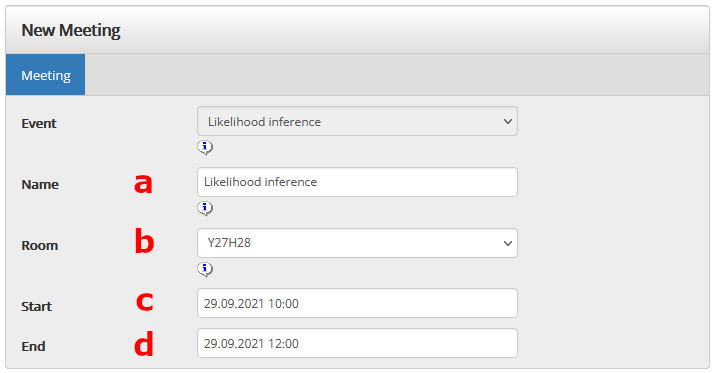
a) Name: By default this is the same as the event's name. However, you might want to enter a keyword that describes what exactly the lecture is about on that specific date.
b) Room: By default this is the Default Room you have set before on the Event. Select another room if the event does not take place in the default room on that date.
c) Start: Date and time when the event starts
d) End: Date and time when the event ends
Save the form. You should now see your event:
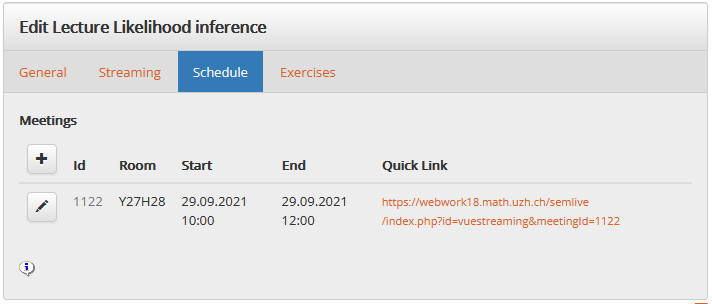
Let's assume the event should occurr once a week, for 14 weeks. At the moment there is only one occurrence. To create the remaining occurrences, edit the meeting (Pencil icon) and then switch to the Recurrence tab.
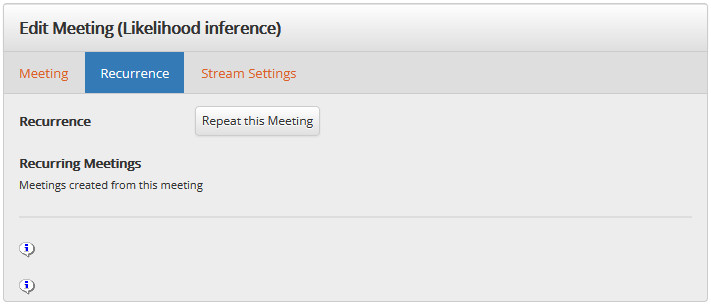
Click Repeat this meeting. The form in the image below will open. To create the remaining 13 occurrences of the event, configure the as shown:
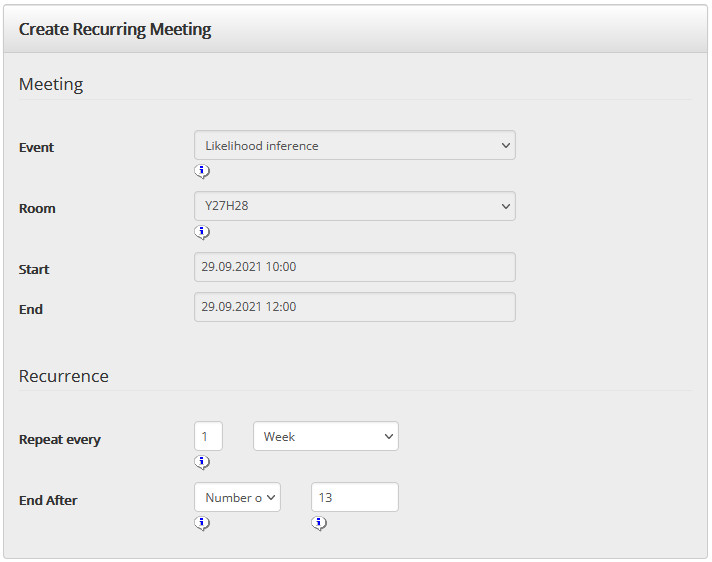
Once this form is saved, multiple meetings are created using the chosen options. You will land on the Detail page of your event. If everything went right, you should see this message:

Streaming
Starting the Stream (Speaker / Assistant)
The event can be streamed once its schedule has been created. The speaker of the event can turn on (and off) devices in the room with the click of a button. This can either be done in a browser (e.g. on a laptop or computer) or on the SeminarLive touchpad. Both ways are described below.
In the Browser
Navigate to the My Events page (Login required)
- a) Click the Join Button on the left side in the 'Today's Meetings' section
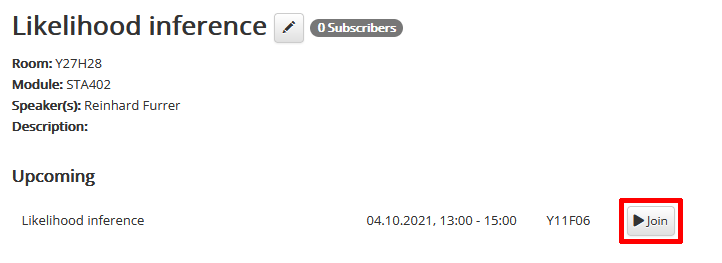
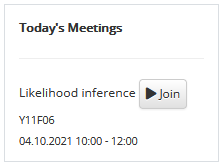 b) OR: alternatively you can open the detail page of your event by clicking the magnifying glass. On this page you can see the whole schedule of your event. At the top, in the 'Upcoming' section, you can click 'Join' to open the streaming page.
- Click the button shown in the picture below. You will now see all devices in the room which can be turned on and off. Toggle the switches next to the device's name to turn it on/off.
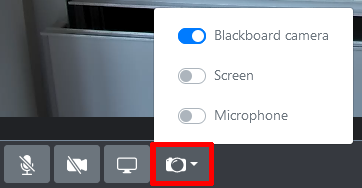
On the Touch
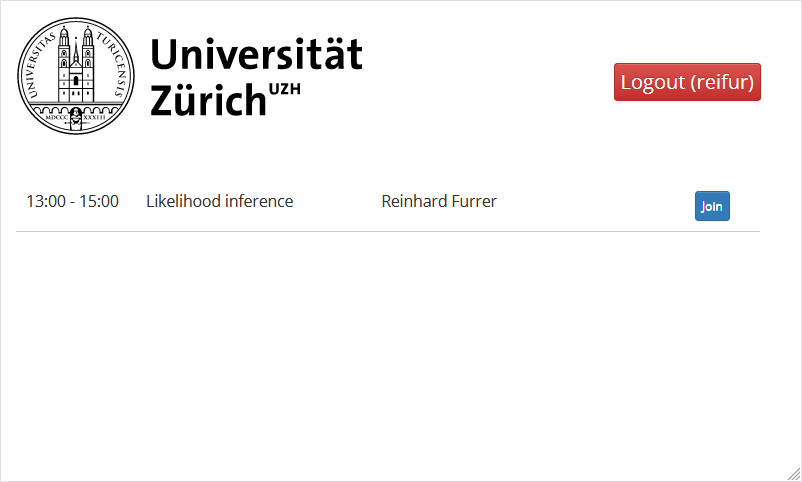
- Log in by holding your UZH card to the backside of the Touch. If this is the first time you are using your card to log in, you will be prompted to enter your UZH/SeminarLive username and password. Otherwise you will be logged in immediately. Alternatively, you can log in without your card, by clicking 'Login' and then entering your UZH/SeminarLive username and password.
- Join the 'Meeting' by clicking 'Join'.
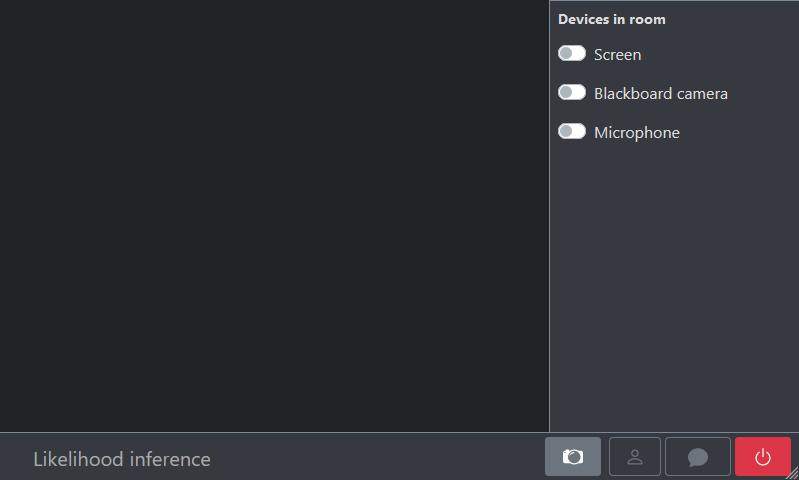
- Toggle the button next to a device's name to toggle it on or off. The device's stream (e.g. the blackboard camera) will be visible in the meeting a few seconds after turning it on.
Streaming Interface
The streaming interface for SeminarLive looks and works as shown and explained below.
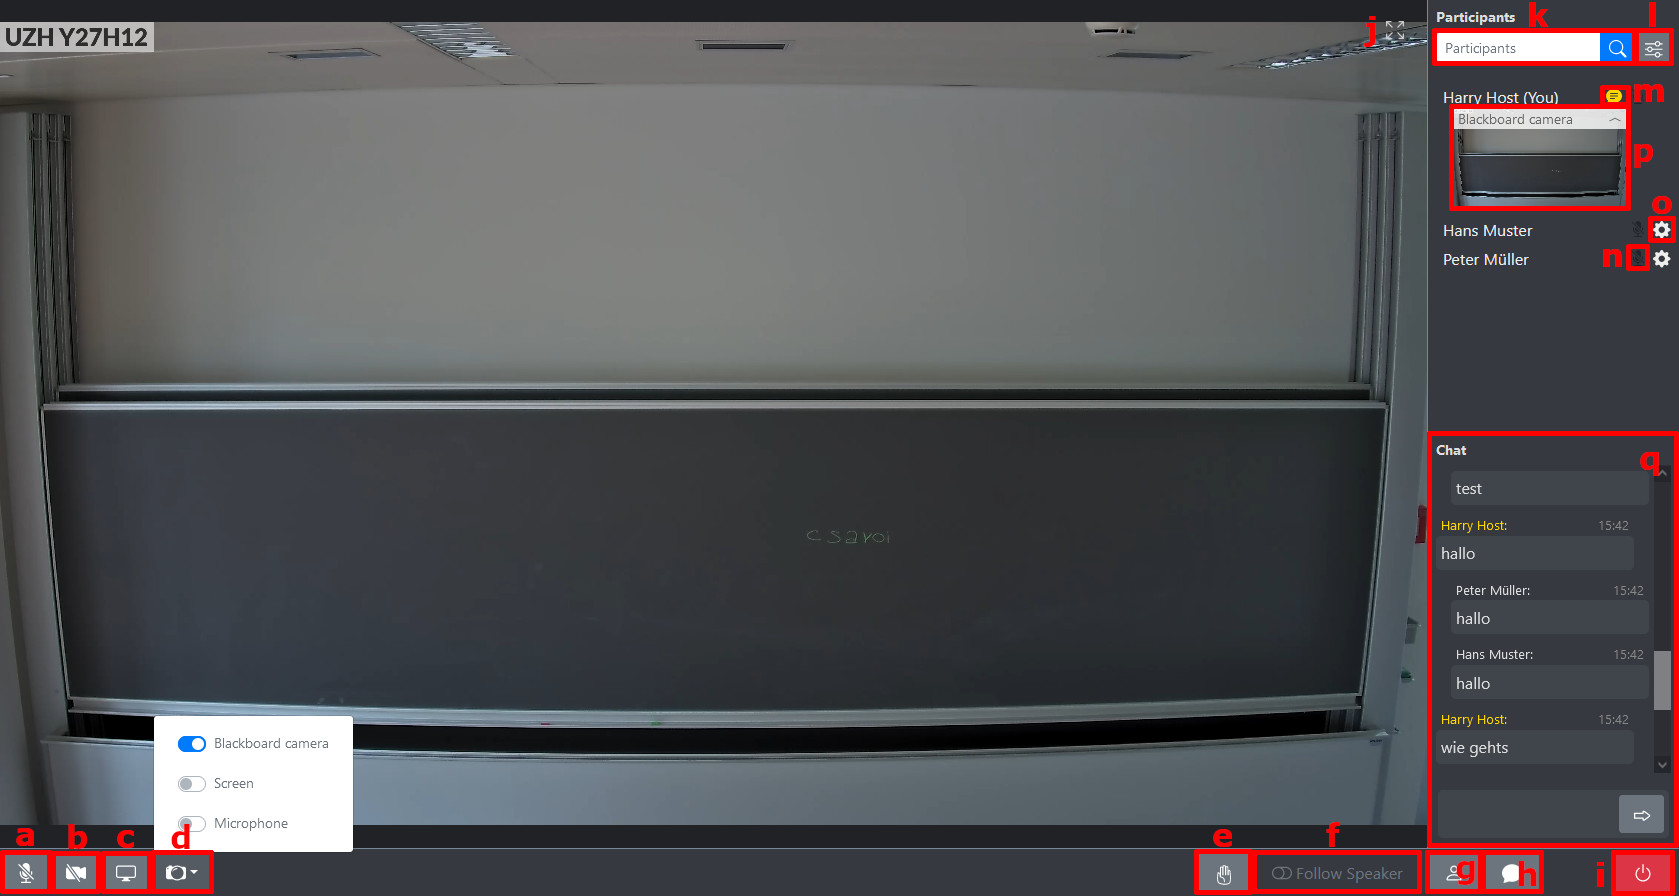
a) Mute / Unmute yourself. The first time you unmute yourself, your browser will ask for permission to access your microphone. Confirm this with yes. When you are unmuted, you can also adjust your own volume.
b) Share your camera (e.g. built in camera of a laptop/mobilee device or a webcam)
c) Share your screen. You can share multiple screens simultaneously. Please note that screensharing might not be possible on tablets and mobile phones.
d) Show Devices in the Room such as Blackboard Camera, Ceiling Microphones, etc. By turning a switch, each device can be turned on / off individually. This option is only available to the host.
e) Raise Hand. Click this to signal that you have a question. Other participants will see the hand icon next to your name. You can click it again to lower the hand. The host of the meeting is able to lower any hands.
f) Follow Speaker. If you turn Follow Speaker mode on, then you will always see the stream which is currently selected by the speaker. This is useful if the speaker is using multiple streams (e.g. Camera, Blackboard, ...) to explain something. If this is turned off, then you will have to manually click on a stream's thumbnail to see it in high quality.
g) Show/Hide Participant Panel Click this to show/hide the panel with all participants in the top right.
h) Show/Hide Chat Panel Click this to show/hide the chat.
i) Leave Meeting Leave the meeting and return to the previous page
j) Enter Fullscreen. Leave Fullscreen by cliicking the icon again or by hitting ESC.
k) Search Participant in the list below
l) Participant Panel Settings Contains an option to quickly expand/collapse all stream thumbnails. More options will come in the future.
m) Shows the Role of a participant. White speeach bubble = Speaker, golden speech bubble = host.
n) Mute or unmute another user. This has no effect for other participants, only for yourself.
o) Participant Settings. Contains multiple settings: Adjust volume of participant, grant/revoke speaker privilege (Host only), more settings in the future.
p) Thumbnail. The thumbnail of a stream that is shared in the meeting. Thumbnails appear for cameras and screenshares. They can be clicked to display the high quality stream. The arrow symbol in the top right corner of the thumbnail can be clicked to expand or collapse the thumbnail.
q) Chat
Known Problems
- Audio / Video Shift
- Livestream: there is a 1-2 second shift between video and audio. One reason is the 4k blackboard camera - this is hardware related.
- Recording: unfortunately the shift between video and audio is not constant (it seems there is a relation between shift and length of the recording).
- Apple Safari
- We have reports from Apple Safari users about audio breaks in recordings every 1-2 seconds - Google Chrome seems to be fine.
To be implemented
- Speaker remote, student on-site: starting beamer and audio in seminar room from remote - we're working on it, should be ready in the first weeks of HS22.
- Automatic import of student per lecture.
- Unattended start / stop of recording
- Offer access to recordings after a defined period of time (students should not have access to the recordings on the same day).
- Chat: Emoticons (for votes)
Rooms to be installed: Y27H26

